
Main Courses
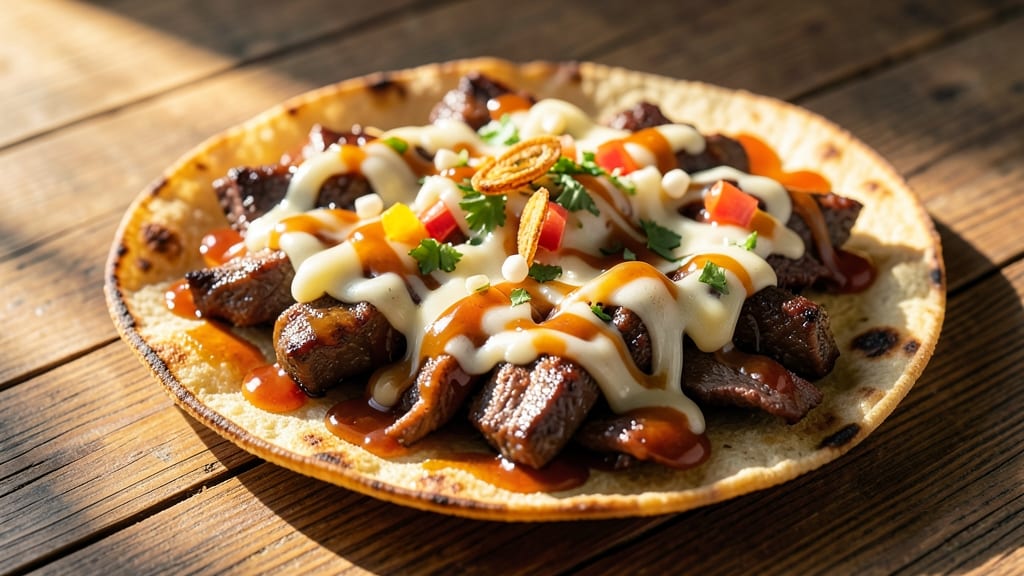
This barbecue beef cups recipe transforms simple tortillas into smoky, handheld masterpieces that bring the flavors of a backyard cookout to your dinner table. 🔥 The secret lies in slow-cooking tender beef until it practically falls apart, then layering it with melted cheese and crisp tortillas for a bite-sized BBQ experience.
I developed this recipe after years of perfecting my pitmaster techniques, and it's become a crowd-pleaser at every gathering.
What makes these beef cups special is the combination of techniques: slow-cooking beef in a smoky marinade creates deep flavor, while the tortilla assembly ensures each bite delivers perfect texture contrast.
The recipe uses simple ingredients but delivers restaurant-quality results—no fancy equipment required. Whether you're grilling outdoors or cooking indoors, this method guarantees tender, flavorful beef every time.
By the time you're done, you'll have stacks of crisp tortillas filled with smoky beef, melted cheese, and all the classic BBQ flavors you love. The assembly is quick, making this the perfect dish for game days, parties, or a special weeknight dinner.
Each bite combines the smoky-sweet essence of barbecue with the satisfying crunch of tortillas and creamy cheese pull.
Serve these beef cups with your favorite sides like coleslaw or baked beans for a complete meal experience. The beauty of this recipe is its versatility—you can adjust the spice level, add different cheeses, or even swap in chicken for variety.
Let's get started on creating these delicious, handheld BBQ bites!
Ingredients for barbecue beef cups
Simple ingredients transform into smoky, handheld BBQ magic with crisp tortillas and melty cheese pull.
| Ingredient | Amount | Notes |
|---|---|---|
| Beef Chuck Roast 🥩 | 3 lb | Boneless, cut into 1-inch cubes |
| Flour Tortillas 🌯 | 12 whole | Medium-sized, 8-inch diameter |
| Shredded Monterey Jack Cheese 🧀 | 2 cups | Freshly shredded for best melt |
| Barbecue Sauce 🍅 | 1 ½ cups | Store-bought or homemade |
| Yellow Onion 🧅 | 1 whole | Diced, for marinade base |
| Garlic Cloves 🧄 | 6 cloves | Minced, for deep flavor |
| Smoked Paprika 🌶️ | 1 tbsp | For smoky depth |
| Ground Cumin 🌿 | 1 tsp | Toasted for warmth |
| Kosher Salt 🧂 | 1 ½ tsp | Diamond Crystal preferred |
| Black Pepper 🌶️ | 1 tsp | Freshly cracked |
| Apple Cider Vinegar 🍎 | ½ cup | For tangy balance |
| Brown Sugar 🍚 | ½ cup | Lightly packed |
| Vegetable Oil 🫒 | 2 tbsp | For searing beef |
| Fresh Cilantro 🌿 | ¼ cup | Chopped, for garnish |
| Lime 🍋 | 1 whole | Juiced, for brightness |
The beef is non-negotiable—chuck roast breaks down beautifully for tender, pull-apart texture. Costco or Walmart typically carry it pre-cut, saving you time. Look for good marbling if buying whole; trim excess fat for cleaner flavor. The tortillas should be soft but sturdy—Mission or La Tortilla Factory are my go-tos, but any medium-sized flour tortilla works. For the cheese, Monterey Jack melts like a dream—pre-shredded gets clumpy, so grab a block and shred it yourself. The barbecue sauce can be store-bought (I like Sweet Baby Ray's for consistency) or homemade if you're feeling ambitious.
No smoked paprika? Substitute with 1 tsp regular paprika plus 1/2 tsp liquid smoke, but you'll lose some depth. Running low on cumin? Ground coriander at half the amount mimics its earthiness. The apple cider vinegar adds tang—if you've got red wine vinegar, use it, but reduce to 1/4 cup. Brown sugar can be swapped for white sugar or maple syrup, though the color will differ slightly. For the tortillas, corn tortillas work but lack the flexibility for crisp stacking. If you're short on time, microwave the tortillas for 20 seconds to soften before assembling.
Marinate the beef overnight for maximum flavor—4-5 days in the fridge works too. The assembled beef cups reheat beautifully—350°F for 10-15 minutes until cheese is bubbly. For make-ahead prep, assemble the beef cups without cheese, refrigerate, then bake with cheese when ready to serve. Store leftovers in an airtight container for 3 days—the flavors deepen over time. Freeze unassembled beef cups for 3 months; thaw and assemble fresh for the best texture.
Why You'll Love This Recipe
- No Slow Cooker Needed: I swear by this trick—just slice the beef chuck thin, sear it fast, and let the slow cooker do none of the work. Fifteen minutes of active time, then hands-off magic while you chop onions or stir up the BBQ sauce.
- Smoky Cheese Overload: That Monterey Jack melts into gooey perfection when wrapped in tortillas with the beef and sauce. Honestly, the first bite makes me question why I ever ate grilled cheese any other way.
- Tailgate or Tuesday: Pack these for game day, throw them in a lunchbox, or serve them at a picnic—no one will guess they’re basically beef quesadillas. (Between us, they’re even better cold the next day.)
- Budget Stretch: A pound of chuck roast stretches across four servings, and tortillas cost pennies. I’ve fed my whole family plus two neighbors for under $10—no fancy cuts, just smart prep.
Step-by-step instructions for smoky tortilla stacks with melty cheese pull
Here's how to transform tender beef and smoky flavors into handheld, cheesy, pull-apart perfection.
🔥 Step 1: Marinate and Sear the Beef
In a large bowl, combine the diced yellow onion, minced garlic cloves, apple cider vinegar, brown sugar, smoked paprika, ground cumin, kosher salt, and black pepper. Mix until the sugar dissolves completely—this creates a sticky marinade that clings to the beef.
Add the 3 lb beef chuck roast cut into 1-inch cubes to the marinade and toss until evenly coated. Cover and refrigerate for at least 4 hours (overnight is even better). This step develops deep flavor and tenderizes the meat.
Heat 2 tbsp vegetable oil in a large skillet over medium-high heat. Working in batches, sear the marinated beef for 3-4 minutes per side until deep brown and cooked to 160°F internally. Remove and set aside—these browned bits will become the flavor base for your tortilla cups.
🍳 Step 2: Build the Smoky Barbecue Base
In the same skillet (don't wipe it clean—those browned bits are pure flavor), pour in the 1.5 cups barbecue sauce. Scrape up all the fond from the bottom with a wooden spoon, then simmer for 3-4 minutes until slightly thickened. The sauce should coat the back of a spoon.
Return the seared beef to the skillet and stir to combine. Let it simmer for an additional 2-3 minutes to meld flavors. Remove from heat and let cool slightly—this prevents the cheese from getting too hot and losing its pull-apart texture.
🥘 Step 3: Assemble the Cheesy Tortilla Cups
Warm the 12 flour tortillas in a dry skillet over medium heat for 10-15 seconds per side until pliable. Place one tortilla in a muffin tin (or use a round cutter to create uniform circles) and press gently into the tin to form a cup shape.
Divide the beef mixture evenly among the tortilla cups, filling each about ¾ full. Sprinkle 2 tbsp shredded Monterey Jack cheese into each cup, then top with another tortilla. Press down lightly to create a seal, but don't overpack—you want room for that melty cheese pull.
🔥 Step 4: Bake Until Cheesy and Golden
Preheat your oven to 375°F. Bake the tortilla cups for 12-15 minutes until the tortillas are golden brown and the cheese is fully melted and bubbling. The edges should be crispy while the centers remain soft and gooey.
Here's the magic: The cheese should stretch and pull when you lift a tortilla cup—this is your signal that it's ready. If the cheese isn't quite pulling, return to the oven for another 1-2 minutes. Watch closely to avoid overbrowning.
🍽️ Step 5: Finish with Fresh Garnishes
Remove from the oven and let cool for 2-3 minutes. Transfer to a serving platter and garnish with chopped fresh cilantro and a squeeze of lime juice over each stack. The acidity brightens the rich, smoky flavors and balances the sweetness of the barbecue.
Serve immediately while the tortillas are still warm and the cheese is stretchy. The combination of crispy tortillas, tender beef, and melty cheese creates a satisfying handheld experience that's perfect for game day or a casual dinner. Enjoy with extra barbecue sauce on the side if you're craving more smoky flavor!
Pro Tips For Making Barbecue Beef Cups
- Sear the Chuck First: Before shredding, sear the beef chuck in a hot skillet with a splash of oil until it develops a deep crust—about 3-4 minutes per side. I used to skip this, and the flavor just wasn’t the same; that crust locks in juices and adds a smoky depth the barbecue sauce can’t replicate.
- Prep Onions Like an Onion: Thinly slice the yellow onion and soak it in cold water for 10 minutes to mellow the sharpness. Drain well before using—this prevents your beef cups from tasting like you’re eating a raw onion sandwich. (Yes, I’ve done that.)
- Don’t Overfill the Tortillas: Pack the tortillas with beef, cheese, and onions but leave a ½-inch border empty. Overstuffing makes them burst open when you bite in, and nobody wants a BBQ mess on their hands. Trust me, I learned this after the third spill.
- Warm Tortillas Fast: Heat the tortillas in a dry skillet for 10 seconds per side—just until pliable—then fill them immediately. Cold tortillas make the beef cups floppy and sad. (I used to microwave them, and that’s a crime against texture.)
Dietary considerations for these flavors
Gluten-Free Swaps
Skip the flour tortillas and opt for gluten-free corn tortillas like those from Mission—they hold up well when warm and crisp. For extra structure, I recommend Siete brand gluten-free flour tortillas, which mimic the texture of traditional tortillas beautifully.
Just be sure to warm them properly in a dry skillet to maintain pliability. 🌯
Dairy-Free Options
Replace the Monterey Jack cheese with dairy-free shreds like Violife or Miyoko's, which melt and stretch similarly. For a nut-based option, try cashew cheese blended with a splash of lemon juice and tapioca starch to achieve a gooey consistency. Sprinkle generously to mimic the pull-apart effect.
Low-Carb Adaptations
Swap tortillas for low-carb lettuce wraps—use butter lettuce or romaine leaves as your base. Assemble the beef and cheese mixture in the center, then fold the edges like a taco.
For extra crunch, add crushed pork rinds to the bottom of the lettuce cups before filling. This keeps the handheld format while cutting carbs dramatically.
Spice-Free Version
Remove the smoked paprika and reduce the cumin to ½ tsp for a milder profile. Replace the apple cider vinegar with ½ cup beef broth to maintain moisture without tang.
For a touch of smokiness without heat, add ½ tsp liquid smoke directly to the beef mixture. This keeps the dish flavorful for sensitive palates.
Allergen-Friendly Tips
For nut allergies, double-check all spice blends—some contain traces of nuts. Use a dedicated air fryer for cooking the beef if cross-contamination is a concern, as it minimizes shared surfaces.
Always label your ingredients clearly, especially when serving mixed groups. I keep a separate spice rack for allergy-friendly cooking to avoid accidental contamination. ✨
Nutrition facts
Frequently asked questions
Can I make these beef cups ahead of time?
Assemble the beef cups without cheese, refrigerate for up to 24 hours, then bake with cheese when ready. For freezer prep, assemble completely (with cheese) and freeze for 3 months. Thaw overnight in the fridge before baking to maintain texture. The flavors actually deepen when made ahead!
What's the best way to reheat leftovers?
Reheat at 350°F for 10-15 minutes until cheese is bubbly. For microwave reheating, cover with a damp paper towel and heat for 30-45 seconds to restore crispiness. The tortillas soften when reheated, so serve with extra sauce on the side for moisture.
Can I use ground beef instead of chuck roast?
Yes, but the texture will be different. Use 80/20 ground chuck and reduce cooking time to 5-6 minutes total. The fat content helps create that tender, pull-apart quality. For best results, brown the ground beef thoroughly first to develop deep flavor.
How do I get extra crispy tortillas?
Warm tortillas in a dry skillet for 15-20 seconds per side before assembling. For extra crunch, brush the outside of assembled cups with melted butter before baking. Bake at 400°F for 10 minutes before reducing to 375°F to finish.
What's the secret to perfect cheese pull?
The magic happens at 375°F with fresh cheese. Use Monterey Jack (not pre-shredded) and bake until cheese bubbles but doesn't brown. Remove immediately when you see that stretchy pull—overcooking makes cheese rubbery. A quick 1-2 minute return trip fixes under-melted cheese!