
Main Courses
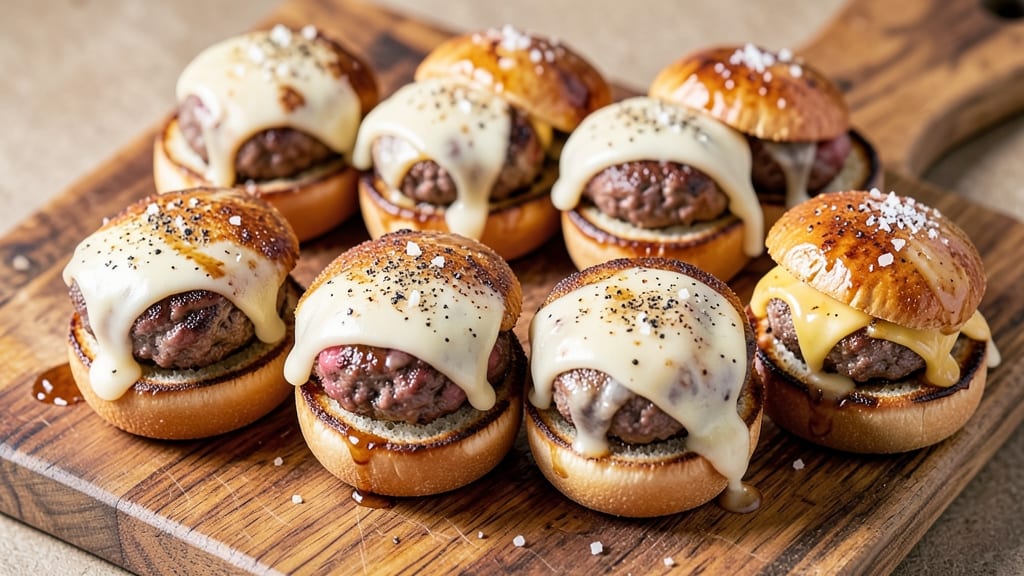
This beef and cheese sliders recipe delivers the perfect bite-sized burger experience with melt-in-your-mouth beef and gooey, pull-apart cheese. The secret lies in perfectly seasoned patties and the right cheese-melting technique that turns every slider into a flavor-packed masterpiece.
Whether you're hosting a game day gathering or craving a quick weeknight meal, these sliders bring restaurant-quality results to your kitchen with minimal effort.
The magic starts with ground beef that's seasoned just right—enough salt and pepper to enhance flavor without overpowering, and a touch of Worcestershire sauce for depth. The patties are shaped small enough to cook quickly on the grill or stovetop, ensuring they stay juicy and tender.
Then comes the cheese: sharp cheddar or a blend of cheeses melts perfectly between the patty and toasted slider buns, creating that irresistible pull-apart texture everyone loves.
What sets these sliders apart is the balance of flavors and textures—crispy buns, savory beef, and creamy, melted cheese all come together in one satisfying bite. The assembly is simple: grill or pan-sear the patties, melt the cheese, and stack everything between soft, toasted buns.
Top with classic toppings like pickles, onions, or a drizzle of special sauce for that extra touch of indulgence.
These sliders are versatile enough for any occasion—serve them as appetizers, a main dish, or even a fun lunch option. The recipe scales easily, so you can make a small batch for two or double it for a crowd.
Let’s get started on creating sliders that will have everyone reaching for seconds.
Ingredients for beef and cheese sliders
Game day essentials: juicy beef, melty cheese, and crispy buns that disappear fast.
| Ingredient | Amount | Notes |
|---|---|---|
| Ground Beef 🥩 | 1 ½ lb | 80/20 fat ratio for juiciness |
| Sharp Cheddar Cheese 🧀 | 8 oz | Block cheese preferred for melting |
| Slider Buns 🍞 | 12 whole | Hawaiian rolls or potato buns |
| Worcestershire Sauce 🍶 | 1 tbsp | For depth of flavor |
| Kosher Salt 🧂 | 1 ½ tsp | Diamond Crystal preferred |
| Ground Black Pepper 🌶️ | 1 tsp | Freshly cracked for best flavor |
| Garlic Powder 🧄 | ½ tsp | For subtle garlic flavor |
| Yellow Onion 🧅 | ¼ cup | Finely diced for topping |
| Dill Pickle Slices 🥒 | ½ cup | Thinly sliced for crunch |
| Mayonnaise 🥫 | ¼ cup | For special sauce |
| Yellow Mustard 🟡 | 1 tbsp | For special sauce |
| Vegetable Oil 🫒 | 2 tbsp | For cooking patties |
| Butter 🧈 | 2 tbsp | Unsalted for toasting buns |
The beef is everything here—80/20 fat ratio keeps it juicy, and that extra fat is what makes sliders so satisfying. Grab ground beef from the butcher section if you can—it's usually fresher than pre-packaged. Costco or Walmart have great prices for larger quantities, but any grocery store will work. Look for bright red color and avoid any packages that smell off. The Worcestershire sauce adds that restaurant-quality depth, so don't skip it—Lea & Perrins is the classic choice, but any good brand works. For the cheese, sharp cheddar from a block melts best—pre-shredded gets clumpy and won't give you that perfect pull-apart texture.
No sharp cheddar? Monterey Jack or pepper jack melts almost as well. Running low on slider buns? Hawaiian rolls from the bakery section work perfectly—just slice them in half. For the special sauce, you can skip the mayo and just use mustard if you prefer, but the combo is what makes it special. The onions and pickles can be swapped for whatever you like—caramelized onions or jalapeños add great flavor twists. If you're making a big batch, prep the toppings ahead—they keep well in the fridge for 3-4 days.
These sliders reheat beautifully—just pop them in the oven at 350°F for 5-10 minutes to melt the cheese again. Store leftovers in an airtight container for 3-4 days in the fridge, or freeze them for up to 3 months. I always make a double batch because they disappear so fast—game day, tailgates, or a quick weeknight dinner, these are always a hit. The buns toast best right before serving, so keep them separate until the last minute.
Why You'll Love This Recipe
- Here’s what sold me: the moment that cheddar starts stretching and oozing when you cut into it. That crispy, salty crust on the outside? Chef’s kiss. (Yes, even on a Tuesday night.)
- Five-Ingredient Magic: I swear by this lineup—ground beef, sharp cheddar, slider buns, Worcestershire, and salt. That’s it. No fancy prep, no hidden ingredients, just pure, satisfying flavor.
- Melty Cheese Bliss: Here’s what sold me: the moment that cheddar starts stretching and oozing when you cut into it. That crispy, salty crust on the outside? Chef’s kiss. (Yes, even on a Tuesday night.)
- Game-Day Ready: These sliders are my secret weapon for tailgates, potlucks, or just because. Serve them warm with pickles on the side, and suddenly you’re the hero of every gathering—no Pinterest-worthy plating required.
Step-by-step instructions for beef and cheese sliders
Here's how to make sliders with perfect juicy beef and melty cheese every time.
Form and Season the Beef Patties
Divide the 1.5 lb ground beef into 12 equal portions (about 2 tablespoons each). Gently shape each portion into a ½-inch thick patty, keeping them slightly wider than the slider buns. I press down gently with my fingers—this prevents them from spreading too much during cooking.
In a small bowl, mix together the 1.5 teaspoons kosher salt, 1 teaspoon ground black pepper, 0.5 teaspoon garlic powder, and 1 tablespoon Worcestershire sauce. Rub this mixture evenly over all sides of each patty. Let them rest for 5 minutes while you prep the toppings. This resting time helps the seasoning adhere better and prevents the patties from shrinking too much on the grill.
Cook the Patties to Juicy Perfection
Heat 2 tablespoons vegetable oil in a large skillet over medium-high heat until shimmering. Add the patties in a single layer, leaving space between them. Cook for 3-4 minutes per side until they reach 160°F internally and develop golden brown crusts. Don't press them with a spatula—they'll release their juices and become dry.
Remove the patties from the skillet and let them rest on a wire rack for 2 minutes. This resting period keeps them juicy while you prepare the cheese topping. If you cut into them too soon, all those delicious juices will escape.
Assemble the Cheese-Stuffed Sliders
Cut the 8 oz sharp cheddar cheese into 12 thin strips (about ½-inch thick each). Place one strip of cheese on top of each cooked patty. Then, gently press a second patty on top of the cheese to create a cheese-stuffed sandwich. This is the magic that makes these sliders so special—the gooey cheese pulls apart perfectly when you take a bite.
Keep the assembled sliders warm in a 200°F oven while you prepare the special sauce and toast the buns. The residual heat will keep everything warm without overcooking the beef.
Make the Special Sauce and Toast the Buns
In a small bowl, whisk together the 0.25 cup mayonnaise and 1 tablespoon yellow mustard until smooth. Finely dice the 0.25 cup yellow onion and fold it into the sauce. Set aside—this tangy, creamy sauce is what ties everything together.
Melt 2 tablespoons butter in a clean skillet over medium heat. Toast the 12 slider buns for 30-45 seconds per side until golden brown. The butter adds extra richness and helps the buns hold up to the juicy filling.
Build and Serve the Sliders
Spread a generous dollop of the special sauce on the bottom half of each toasted bun. Place one cheese-stuffed patty on top, then add 2-3 dill pickle slices for that classic tangy crunch. Top with the bun lid and press gently to secure.
Serve immediately while the cheese is still gooey and the buns are warm. These sliders are best enjoyed fresh—each bite delivers juicy beef, melty cheese, and that perfect crunch from the pickles. Double up for a slider feast!
Pro Tips For Making Beef And Cheese Sliders
- CRUSH THE CHEESE FIRST: Skip the block—grate the sharp cheddar yourself. Pre-shredded cheese has anti-caking agents that make it melt like glue, and you’ll end up with a greasy, uneven mess on your sliders. A quick pulse in a food processor gives you perfect, meltable shreds every time.
- SALT THE BEEF BEFORE COOKING: Season the ground beef before forming the patties—more salt than you think, especially if you’re using leaner cuts. I used to add it after shaping, but the flavor just didn’t penetrate enough. A teaspoon of kosher salt mixed in now means every bite tastes like it’s been seasoned properly.
- USE A THERMOMETER FOR PERFECT DONENESS: Pull the beef at 160°F, not when it looks done. I learned this the hard way—overcooked sliders dry out fast, and undercooked ones ruin the whole batch. A cheap instant-read thermometer takes the guesswork out and keeps your sliders juicy.
- TOAST BUNS WHILE CHEESE MELTS: Pop those slider buns in a toaster or under the broiler while the cheese melts on the beef. This isn’t just about crunch—it toasts the buns enough to hold up to the gooey cheese without turning soggy. Two minutes in the toaster does the trick.
Dietary considerations for this recipe
Gluten-Free Adaptations
Skip the traditional slider buns and use gluten-free Hawaiian rolls from brands like Canyon Bakehouse or Udi's. These buns toast beautifully and hold up well to the juicy filling. For extra security, I brush the buns lightly with olive oil before toasting to prevent them from drying out. 🥖
Dairy-Free Options
Replace the sharp cheddar with dairy-free cheddar shreds from Violife or Daiya. These melt surprisingly well and still create that pull-apart texture. For the special sauce, use dairy-free mayo like Hellmann's Vegan to keep it creamy and tangy. The flavor stays just as rich!
Lower-Carb Versions
Swap the slider buns for lettuce wraps or low-carb buns from Mission Carb Balance. These options cut carbs significantly while keeping the handheld convenience. For extra flavor, I add a sprinkle of garlic powder to the lettuce leaves before assembling.
The beef patties stay the same—just skip the cheese if you're avoiding carbs entirely.
Allergen-Friendly Tips
For nut allergies, always check mayo labels—some brands contain trace amounts. I recommend Duke's Mayonnaise as a safe option. For egg allergies, use egg-free mustard like French's Yellow Mustard, which is typically egg-free. When cooking, keep your workspace clean to avoid cross-contamination with other allergens.
Keto-Friendly Adjustments
Transform these sliders into a keto-friendly meal by using keto buns made from almond or coconut flour, or simply skip the buns entirely. Serve the patties and cheese on a bed of romaine lettuce or butter lettuce leaves.
The special sauce can be made with mayo and mustard as usual, but watch your portion sizes to stay within keto macros.
Nutrition facts
Frequently asked questions
Can I make these sliders ahead of time?
Assemble the sliders without the cheese up to 2 days ahead and refrigerate in an airtight container. When ready to serve, simply cook the patties, add the cheese, and toast the buns. For the cheese-stuffed version, assemble completely and reheat in a 350°F oven for 5-7 minutes to melt the cheese. The buns will need toasting right before serving for that fresh-from-the-grill texture.
What's the best way to keep the patties juicy?
Use 80/20 ground beef for maximum juiciness—the fat keeps the meat tender. Never press the patties while cooking, as this squeezes out the juices. Let them rest for 2 minutes after cooking before assembling. Also, avoid overmixing the beef when forming the patties—just gently shape them to prevent tough texture.
Can I grill these sliders instead of pan-searing?
Yes! Grilling adds great smoky flavor. Cook the patties over medium-high heat for 3-4 minutes per side until they reach 160°F internally. Use a meat thermometer for accuracy. For cheese-stuffed sliders, assemble them on the grill using a grill press to create the perfect seal. Just watch them closely—the cheese melts fast on hot grates!
What if I don't have slider buns?
Use Hawaiian rolls or potato buns instead—they work perfectly! For a quick fix, slice regular hamburger buns in half and toast them. If you're making a large batch, hot dog buns work too, though they're slightly smaller. For extra flavor, brush the buns with melted butter before toasting. The key is to get them warm and slightly crispy.
How can I make these sliders spicier?
Add ½ teaspoon smoked paprika or ¼ teaspoon cayenne pepper to the beef seasoning. For extra heat, top with jalapeños or pickled jalapeños instead of regular pickles. You can also mix in hot sauce with your special sauce—just start with 1 teaspoon and adjust to taste. For a smoky kick, add ½ teaspoon chipotle powder to the patties.