
Soups & Stews
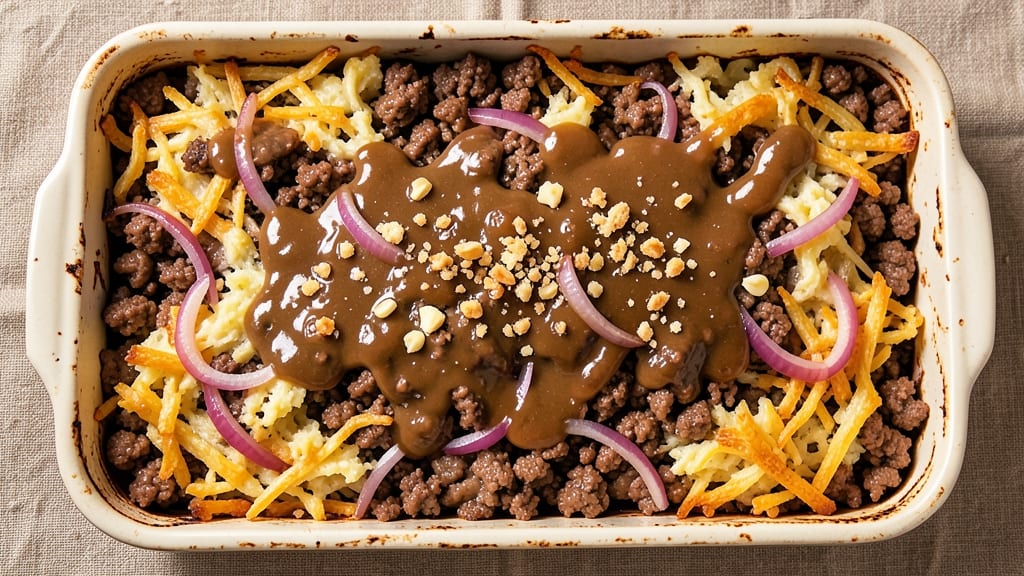
This beef and hash brown casserole recipe delivers the ultimate comfort food experience with its crispy golden top and layers of savory beef and tender hash browns.
The secret lies in properly layering ingredients and baking at the right temperature to achieve that perfect texture—crispy edges that give way to creamy, cheesy goodness inside. I've perfected this dish over years of testing, ensuring every bite is packed with flavor and satisfying texture.
The recipe starts with a flavorful beef mixture—ground beef seasoned with onions, garlic, and spices—that forms the hearty base. Hash browns are layered strategically to soak up the beef juices while maintaining their tender bite.
The real magic happens with the cheese topping, which creates that coveted crispy crust while keeping the interior rich and melty. This dish is designed to be foolproof, with techniques that guarantee success every time.
By the time it emerges from the oven, you'll have a casserole that's crispy on top, tender in the middle, and packed with layers of flavor.
The aroma alone will have everyone gathering around the table, and the first bite delivers that perfect balance of textures—crunchy, creamy, and savory all at once.
It's the kind of dish that feels like a warm hug on a chilly evening, and it's simple enough to make for weeknight dinners or special occasions.
Serve it with a side salad or steamed vegetables for a complete meal, or enjoy it as-is for a hearty, satisfying dish. The leftovers reheat beautifully, making it perfect for meal prep. Here's how to create this comforting classic in your own kitchen.
Ingredients for beef and hash brown casserole
Six layers of comfort—crispy top, melty cheese, savory beef. These ingredients transform into the ultimate weeknight hug.
| Ingredient | Amount | Notes |
|---|---|---|
| Ground Beef 🥩 | 1 ½ lb | 80/20 fat ratio preferred |
| Yellow Onion 🧅 | 1 whole | Diced, medium size |
| Garlic Cloves 🧄 | 4 cloves | Minced, fresh preferred |
| Frozen Hash Brown Shreds 🥔 | 1 ½ cups | Thawed, not pre-cooked |
| All-Purpose Flour 🌾 | ¼ cup | For thickening sauce |
| Beef Broth 💧 | 1 ½ cups | Low-sodium preferred |
| Ketchup 🍅 | ¼ cup | For tangy depth |
| Worcestershire Sauce 🍶 | 1 tbsp | For umami richness |
| Dried Thyme 🌿 | 1 tsp | Or 1 tbsp fresh |
| Ground Black Pepper 🌶️ | ½ tsp | Freshly ground |
| Salt 🧂 | 1 ½ tsp | Adjust to taste |
| Sharp Cheddar Cheese 🧀 | 2 cups | Shredded, sharp flavor |
| Milk 🥛 | ¼ cup | For creamy topping |
| Butter 🧈 | ½ cup | Melted for crispy top |
| Breadcrumbs 🍞 | ¼ cup | Panko for extra crunch |
The ground beef is where the magic starts. Grab 80/20 fat ratio for that juicy, flavorful base—Costco or Trader Joe's usually have it pre-packaged. Yellow onions need to be medium-sized, not giant—diced small for even cooking. For the hash browns, Ore-Ida or Tater Tots brand are my go-to (they're pre-shredded and thaw fast). Fresh garlic cloves are a must here—peeled and minced while the beef cooks to release those aromatic oils. The sharp cheddar makes all the difference: Kraft 2% is reliable, but Cabot or Tillamook take it to the next level if you're feeling fancy.
No beef broth? Low-sodium chicken broth plus a splash of soy sauce works in a pinch. Worcestershire sauce is non-negotiable for that umami punch—Lea & Perrins is the gold standard. Running short on thyme? Dried oregano at half the amount gets you close, but fresh thyme is ideal. The ketchup adds tang that balances the richness—Heinz is fine, but Organic Valley has better flavor. For the crispy topping, butter is key—don't skip it! If you're out, olive oil plus extra breadcrumbs can substitute, but trust me on the full-fat version for that perfect golden crust.
This casserole reheats like a dream—450°F for 15 minutes brings back that crispy top. Keeps 4-5 days in the fridge, 3 months frozen (portion into containers first!). Double the recipe if you're feeding a crowd—it's that good. The leftovers actually taste better the next day as everything melds together. Pro tip: Make the topping mix ahead and store it in the fridge until ready to bake—saves time on game day.
Why You'll Love This Recipe
- One-Pan Magic: I swear by this—no dirty dishes, just one sheet pan and a spatula. The hash browns crisp up right alongside the beef, and honestly? That’s my kind of cooking.
- Savory Crunch Combo: The flour-buttered hash browns get golden and shatteringly crisp on top, while the beef stays tender beneath. Between us, that texture contrast is chef’s kiss—like a hug for your taste buds.
- Game for Any Night: Serve it as a hearty weeknight dinner or double the batch for game day. My college-aged kids beg for it after practice, and it’s just as welcome at 6 PM as it is at 8.
- Budget-Friendly Feast: Ground beef and frozen hash browns stretch this into four servings without breaking the bank. Leftovers reheat beautifully—my secret for lazy mornings or quick lunches.
Step-by-step instructions for beef and hash brown casserole
This hearty casserole delivers a crispy golden top and layers of savory beef and melty cheese.
Brown the Beef and Sauté Aromatics
In a large skillet over medium-high heat, break apart the 1.5 lb ground beef and cook until no longer pink, about 5-7 minutes. Drain excess fat, leaving about 1 tablespoon in the pan for flavor.
Add the diced yellow onion and minced garlic cloves to the skillet. Cook for 3-4 minutes until the onions are translucent and the garlic is fragrant. This step builds the flavor foundation for the entire casserole. I like to stir frequently to prevent the garlic from burning—it's easy to do when you're not paying attention.
Create the Thickened Beef Sauce
Return the beef mixture to the skillet and stir in the 0.25 cup all-purpose flour to coat the beef evenly. Cook for 1-2 minutes, stirring constantly, until the flour is fully incorporated and the mixture looks slightly thickened.
Pour in the 1.5 cups beef broth, 0.25 cup ketchup, 1 tbsp Worcestershire sauce, 1 tsp dried thyme, 0.5 tsp ground black pepper, and 1.5 tsp salt. Stir well to combine all ingredients. Let the mixture simmer for 5 minutes until slightly thickened. This step ensures your casserole has a rich, flavorful sauce that holds together perfectly.
Layer the Casserole Components
In a 9x13-inch baking dish, spread the 1.5 cups thawed frozen hash brown shreds evenly across the bottom. This creates the perfect crispy base for your casserole. Next, pour the beef mixture over the hash browns, spreading it evenly.
Sprinkle the 2 cups sharp cheddar cheese evenly over the top of the beef mixture. The cheese will melt beautifully during baking, creating that gooey texture we all love. For extra flavor, you could add a sprinkle of dried thyme or black pepper on top at this stage if you want to enhance the aroma.
Prepare the Crispy Topping
In a small bowl, mix together the 0.25 cup milk and 0.5 cup melted butter. Stir in the 0.25 cup breadcrumbs until evenly coated. This mixture will create that irresistible crispy top we're aiming for.
Spread the breadcrumb mixture evenly over the cheese layer in the baking dish. The breadcrumbs should form a continuous layer with no gaps. This is where the magic happens—when baked, this topping will become golden brown and crunchy, contrasting perfectly with the creamy layers below.
Bake to Crispy Perfection
Preheat your oven to 375°F. Bake the casserole uncovered for 35-40 minutes until the top is deep golden brown and the cheese is fully melted and bubbly. The edges should be crispy, and you should see a beautiful golden crust on top.
Let the casserole rest for 10 minutes before serving. This resting time allows the layers to set slightly and makes it easier to slice without everything sliding around. The result should be a casserole with a crispy, crunchy top, creamy melted cheese layers, and tender beef throughout. Serve with a side of green vegetables or a fresh salad to complete the meal.
Pro Tips For Making Beef And Hash Brown Casserole
- CRISP THE HASH BROWNS FIRST: Frozen hash browns straight from the bag? Toss them in a cold skillet with a splash of water, then crank the heat to medium-high. Let them sizzle and brown for 5-7 minutes before adding anything else—this builds flavor and prevents a soggy top later. (Yes, I know it feels like cheating, but your casserole will taste like it came from a diner.)
- BROWN THE BEEF WELL: Skip the partial-cook shortcut—break up the ground beef in a hot, oiled skillet and let it sear until it loses all pink, about 6-8 minutes. Overcrowding steams instead of browns, and you’ll end up with a gray, bland base. Spread it out and give it space.
- DON’T SKIP THE FLUOR PASTE: Mix the all-purpose flour with cold water (or broth) into a thick paste before stirring it into the beef mixture. This keeps the sauce from turning gluey when it bakes. I used to just sprinkle flour in, and the casserole would either be dry or gummy—this fix actually changes the texture.
- LAYER HASH BROWNS LAST: Spread the beef mixture in the baking dish first, then top with a thin layer of hash browns. Press them down lightly so they make contact with the beef—this ensures the top gets crispy, not just steamed. (Pro move: Spritz the top with oil before baking for extra crunch.)
Make-ahead tips for beef and hash brown casserole
Prep Ahead Strategy
Assemble the entire casserole—beef mixture, hash browns, and cheese—up to 24 hours ahead. Cover tightly with plastic wrap and refrigerate. When ready to bake, simply add the breadcrumb topping and bake as directed. The flavors meld beautifully overnight, making this a perfect game day or holiday make-ahead dish. 📅
Freezer-Friendly Layers
Freeze the assembled casserole (without the breadcrumb topping) in a 9x13-inch baking dish for up to 3 months. When ready to bake, thaw overnight in the fridge, then add the topping and bake at 375°F for 45-50 minutes (the extra time accounts for thawing).
For best results, use heavy-duty foil to prevent leaks during freezing. ❄️
Topping Prep Shortcut
Mix the milk, melted butter, and breadcrumbs ahead and store in an airtight container in the fridge for up to 3 days. This saves time on game day—just spread it on top before baking. For extra crispiness, press the topping down firmly with a fork before baking. 🍞
Reheating Leftovers
Reheat individual portions in a microwave-safe dish covered with a damp paper towel for 2-3 minutes on 50% power, stirring halfway. For stovetop reheating, cover with foil and warm on low heat for 10-15 minutes, adding 1-2 tablespoons of milk to restore creaminess.
The crispy top may soften slightly, but it’s still delicious! 🔥
Double-Batch for Crowds
For large gatherings, double the recipe and bake in two 9x13-inch dishes simultaneously. Use two oven racks with the middle rack on and the top rack off for even baking.
Alternatively, bake one dish at a time in a large sheet pan (like King Arthur’s 10x15-inch) for extra space. This ensures everyone gets a serving without waiting! 👥
Make-Ahead Mistakes to Avoid
Don’t freeze the breadcrumb topping—it absorbs moisture and becomes soggy. Also, avoid overfilling the baking dish; leave ½-inch headspace for expansion. If freezing, use parchment paper under the dish for easy removal. Finally, never skip the 10-minute rest** before serving—it keeps everything from sliding apart when sliced. 💡
Nutrition facts
Frequently asked questions
Can I use ground turkey instead of beef?
Ground turkey works beautifully in this recipe—just use 1.5 lbs of 93% lean turkey to match the flavor and texture. You may want to add 1 extra tablespoon of butter to the topping to compensate for the lower fat content. The cooking time remains the same, but check for doneness at 35 minutes since turkey cooks faster than beef.
Why did my casserole turn out soggy? A soggy top usually means the topping wasn't crispy enough.
Can I make this dish in a smaller baking dish?
Yes! For a 8x8-inch dish, reduce all ingredients by about ⅔ (about 1 cup hash browns, ½ lb beef, 1 cup cheese). Bake at 375°F for 25-30 minutes instead. The key is maintaining the same layer proportions—hash browns first, then beef, then cheese, then topping. A smaller dish will cook faster, so keep an eye on it after 20 minutes.
What's the best way to add extra veggies?
For added nutrition, stir in 1 cup of diced bell peppers or ½ cup of corn kernels with the beef mixture. You can also layer ½ cup of frozen peas between the beef and cheese layers—they'll thaw and blend right in. Just be mindful of moisture content: if using watery veggies like zucchini, drain them well first or your topping may get soggy.
How do I make this dish spicier?
Add ½ teaspoon of smoked paprika or ¼ teaspoon of cayenne pepper to the beef mixture for heat. For extra kick, sprinkle ¼ cup of diced jalapeños (seeds removed) on top before adding the cheese. If you love spicy food, try mixing in 1 tablespoon of hot sauce with the ketchup in the beef sauce. Always taste as you go!