
Soups & Stews
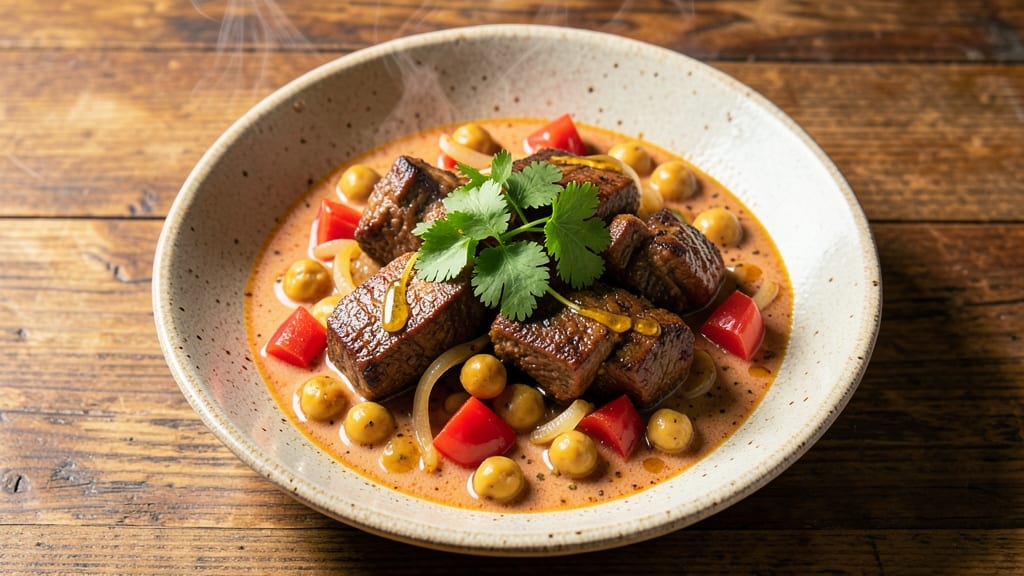
This beef and chickpea curry recipe delivers restaurant-quality depth with just one pot and simple techniques. The aromatic blend of cumin, coriander, and turmeric builds layers of flavor while tenderizing the beef, while coconut milk creates a velvety sauce that balances the dish's rich complexity.
I developed this version after years of testing—it's the perfect harmony of traditional spices and modern convenience, ready in under an hour.
The secret lies in proper spice blooming and slow cooking. Sautéing whole spices in hot oil unlocks their full potential before adding the beef, while chickpeas absorb the rich, tomato-coconut sauce beautifully. This method transforms tough cuts into melt-in-your-mouth pieces while keeping the chickpeas perfectly tender.
The result is a curry that's hearty enough for a main dish but versatile enough to pair with rice, naan, or even crusty bread.
What makes this recipe stand out is its balance—spicy yet approachable, creamy yet not overly rich, and packed with protein from both beef and chickpeas.
The coconut milk adds natural sweetness that complements the acidity of the tomatoes, while yogurt at the end cools the heat just enough to make every bite satisfying. Garnish with fresh cilantro and lime for brightness that cuts through the richness.
This curry reheats beautifully, making it perfect for meal prep or feeding a crowd. The flavors actually deepen overnight, so leftovers taste even better the next day.
Whether you're serving it for a weeknight dinner or a special gathering, this recipe delivers professional-quality results with minimal effort—exactly what you want from a one-pot wonder.
Ingredients for beef and chickpea curry
Simple, aromatic ingredients transform into a restaurant-worthy curry with just one pot.
| Ingredient | Amount | Notes |
|---|---|---|
| Chuck Roast 🥩 | 1 ½ lb | Pre-cubed for even cooking |
| Chickpeas 🌾 | 1 ½ cups | Canned, drained and rinsed |
| Coconut Milk 🥥 | 1 can | Full-fat, 13.5 oz can |
| Tomato Paste 🍅 | 2 tbsp | Smooth, not chunky |
| Yellow Onion 🧅 | 1 whole | Diced, medium size |
| Garlic Cloves 🧄 | 4 cloves | Minced, fresh preferred |
| Ground Cumin 🌿 | 1 ½ tsp | Toasted for depth |
| Ground Coriander 🌿 | 1 tsp | Freshly ground preferred |
| Turmeric Powder 🌶️ | ½ tsp | Bright yellow color |
| Ginger Root 🌿 | 1 tbsp | Freshly grated |
| Plain Yogurt 🥛 | ¼ cup | Full-fat for creaminess |
| Fresh Cilantro 🌿 | ¼ cup | Chopped, for garnish |
| Lime Juice 🍋 | 1 tbsp | Freshly squeezed |
| Vegetable Oil 🫒 | 2 tbsp | High smoke point |
| Salt 🧂 | 1 ½ tsp | Kosher or sea salt |
The chuck roast is your secret weapon here—look for well-marbled cuts at the grocery store's butcher counter. Costco or Whole Foods often have pre-cubed chuck, which saves time. Fresh ginger and garlic make all the difference, so grab them at the store's produce section if they're not already in your pantry. Coconut milk should be full-fat (the can will say it) for that rich, velvety texture. If you can't find fresh cilantro, dried works at half the amount, but it won't have the same bright finish.
No fresh ginger? Substitute 1/2 teaspoon ground ginger—it won't be as vibrant but works in a pinch. Running low on yogurt? Greek yogurt or sour cream adds creaminess, though the tang will differ slightly. The tomato paste can be skipped if you're using fresh tomatoes, but canned San Marzano tomatoes (if you have them) add a depth store-bought paste can't match. For extra heat, add a pinch of cayenne or a diced jalapeño at the end. The chickpeas should be canned, drained, and rinsed—no need to soak unless you're using dried.
This curry tastes even better the next day, so double the batch if you're feeding a crowd. Store leftovers in the fridge for up to 5 days or freeze for 3 months. Reheat gently on the stove with a splash of water or coconut milk to restore creaminess. The yogurt should be added at the very end—stir it in just before serving so it doesn't curdle. Garnish with lime zest for an extra pop of brightness that cuts through the richness.
Why You'll Love This Recipe
- One-Pot Magic: I swear by this recipe when I’m too tired to wash another pan. Chuck roast and chickpeas simmer together in the same pot the tomato paste caramelizes into—no extra dishes, just deep flavor with minimal effort. Honestly, the only cleanup is the spoon I use to scrape the last bites from the pan.
- Rich Without Effort: That first spoonful of coconut milk and tomato paste blending into tender beef? It’s like a hug in a bowl. The onions soften into sweetness while the chuck roast falls apart, soaking up all the creamy, spiced goodness—no fancy techniques, just pure satisfaction.
- Meal Prep MVP: Between us, this curry tastes better the next day. I make a big batch on Sundays, and by Wednesday, the flavors have melded into something even more complex. Freeze half for lazy nights, or reheat it for a quick lunch—it’s my go-to for busy weeks.
- Budget-Friendly Feast: Chuck roast stretches across multiple meals, and chickpeas add protein without breaking the bank. A can of coconut milk and a single onion bulk up the dish, making it a reliable, wallet-friendly staple. Plus, leftovers turn into sandwiches or wraps—waste nothing.
Step-by-step instructions for beef and chickpea curry
Aromatic, rich, and perfectly balanced—this one-pot curry delivers restaurant-quality depth with minimal effort.
Sear the Chuck Roast for Deep Flavor
Heat the 2 tablespoons vegetable oil in a heavy-bottomed pot over medium-high heat until shimmering. Pat the 1.5 lb chuck roast dry with paper towels and cut it into 1-inch cubes for even cooking. Working in batches if needed, sear the beef for 3-4 minutes per side until deeply browned and caramelized. This step builds the foundation of flavor—don't rush it.
Once browned, remove the beef with a slotted spoon and set aside. You'll notice the pot has a beautiful, dark crust of fond at the bottom—this will dissolve into the sauce later, adding layers of richness. Keep the pot on the heat for now; we'll use it immediately for the aromatics.
Build the Spice Base with Onion and Aromatics
Add the diced yellow onion to the same pot and cook over medium heat for 5-6 minutes, stirring occasionally, until softened and golden. This is where the curry develops its sweet, caramelized depth. When the onions are translucent, add the 4 cloves minced garlic cloves, 1 tablespoon freshly grated ginger root, 1.5 teaspoons ground cumin, 1 teaspoon ground coriander, and 0.5 teaspoon turmeric powder. Stir constantly for 1-2 minutes until fragrant—you'll smell the spices bloom and transform the raw garlic and ginger into something aromatic and complex.
Next, stir in the 2 tablespoons tomato paste and cook for another 2 minutes, breaking it down into the onion mixture. This creates a thick, flavorful paste that will serve as the backbone of your curry. If the spices start to stick, add 1-2 tablespoons water to keep everything moving smoothly.
Simmer the Curry with Coconut Milk and Chickpeas
Pour in the 1 can coconut milk, scraping up any browned bits from the bottom of the pot. Add the 1.5 cups drained chickpeas, 1.5 teaspoons salt, and return the seared beef to the pot. Bring everything to a gentle simmer over medium-low heat, then reduce the heat to maintain a barely bubbling state. Cover the pot and let it cook for 1.5 hours, stirring occasionally. The curry should thicken gradually as the beef tenderizes—this low-and-slow approach ensures the meat becomes fork-tender without drying out.
After 1 hour, taste the curry and adjust the seasoning if needed. You might need a touch more salt or a pinch of turmeric powder for color. The sauce should coat the back of a spoon but still be loose enough to spoon over rice. If it's too thick, add 2-3 tablespoons water to reach your desired consistency.
Finish with Yogurt and Fresh Herbs
Once the beef is fork-tender and the flavors have melded, stir in the 0.25 cup plain yogurt and 1 tablespoon lime juice. Simmer for an additional 5 minutes—this step adds a bright, tangy contrast to the rich coconut and beef. The yogurt will create a silky texture, while the lime juice brightens the entire dish. Taste again and adjust the seasoning one final time, ensuring the balance between spice, sweetness, and acidity is perfect.
Remove the pot from heat and let the curry sit for 5 minutes to thicken slightly. Stir in the 0.25 cup chopped fresh cilantro just before serving. The herbs add a fresh, vibrant finish that cuts through the richness of the coconut and beef. Serve immediately over steamed basmati rice, garnished with an extra sprinkle of cilantro if desired.
Pro Tips For Making Beef And Chickpea Curry
- Brown the Chuck First: Chuck roast is tough—don’t skip the sear. After slicing it against the grain (about ½-inch thick), hit the pan with 2 tablespoons of oil and high heat. Let those edges turn deep golden before pulling them out—this locks in flavor and makes the meat tender later. I used to rush this, and the curry always tasted flat.
- Sauté Onions Until Sticky: Dice the onion finely (smaller than you think) and cook it in the same beef fat until it’s not just soft but actually caramelized—edges browning, sugars melting. This isn’t just flavor; it’s the base for the sauce. After burning three batches, I finally figured out: low and slow for 10-12 minutes, stirring occasionally.
- Simmer, Don’t Boil: Once you add the coconut milk and tomato paste, the curry needs gentle heat—just enough to see tiny bubbles at the edges, not a rolling boil. Too much heat breaks the chickpeas and curdles the coconut milk. I was skeptical until I tried it: the sauce stays rich, and the chickpeas hold their shape.
- Add Chickpeas Late: Hold off on tossing in the chickpeas until the beef is nearly done—about 20 minutes before the end. They’ll soak up the flavors better and won’t turn mushy. If you’re using canned, drain and rinse them first; the starchy water makes the sauce grainy. (Yes, even if you’re impatient like me.)
Storing and reheating this dish
Refrigerator Storage
Let your curry cool to room temperature (about 30-45 minutes) before transferring to airtight containers. I use glass Pyrex containers with snap-on lids—they’re microwave-safe and keep flavors intact for up to 5 days. The spices and coconut milk blend even better overnight, deepening the complexity. Just
Freezer Prep Tips
For longer storage, divide the curry into quart-sized freezer bags or airtight containers, leaving 1-inch headspace for expansion. Label with the date—this curry stays delicious for 3 months. To prevent freezer burn, squeeze out excess air before sealing. I like to freeze portions in 1-cup servings for easy reheating later. 🧊
Stovetop Reheating
My preferred method is stovetop reheating—it preserves texture and prevents curdling. Place the curry in a pot over medium-low heat and add 2-3 tablespoons water or coconut milk to prevent sticking. Stir occasionally for 10-15 minutes until heated through (165°F).
The yogurt will separate slightly if overcooked, so keep heat gentle. Taste and adjust seasoning—it often needs a pinch of salt after reheating. 🔥
Microwave Safety
For quick reheating, transfer a portion to a microwave-safe bowl and cover loosely with a damp paper towel. Heat on 50% power in 2-minute intervals, stirring between each, until hot. Avoid full power—it can make the yogurt stringy.
If the curry looks dry, add 1 tablespoon coconut milk before reheating. Always check the temperature with a thermometer to ensure it reaches 165°F. ⏱️
Reviving Leftovers
If your curry tastes flat after reheating, it’s likely lost some moisture. Stir in 1 tablespoon yogurt or a splash of lime juice to restore brightness. For extra richness, add 1-2 tablespoons coconut milk** while reheating.
Garnish with fresh cilantro and a squeeze of lime before serving—this simple step makes all the difference. Trust me, your leftovers will taste almost as good as fresh! 💫
Nutrition facts
Frequently asked questions
Can I use ground beef instead of chuck roast?
Yes, but the texture will be different. Ground beef cooks much faster and can turn dry if simmered too long. Use 1 lb lean ground beef and reduce the cooking time to 45 minutes instead of 1.5 hours. The curry will still be delicious but with a meatier, less tender bite. For best results, brown the ground beef thoroughly first to develop deep flavor.
How can I make this curry less spicy?
Reduce or omit the cayenne pepper entirely, and use ½ teaspoon ground coriander instead of the full 1 teaspoon—it's naturally milder. For extra cooling, add 2 tablespoons plain yogurt at the end or serve with extra naan to soak up the heat. The coconut milk already helps balance spice levels naturally.
What's the best way to thicken a thin curry?
Simmer uncovered for 5-10 minutes to reduce the liquid, or stir in 1 tablespoon tomato paste to thicken immediately. For a creamier texture, whisk in 2 tablespoons coconut milk and simmer for 3 minutes. If the curry is too thin from the start, reduce the coconut milk to ½ can next time.
Can I substitute chickpeas with another legume?
Try 1.5 cups cooked lentils (green or brown) or 1 cup cooked black beans for a different texture. Lentils hold their shape better, while black beans add a slightly smoky depth. Drain and rinse canned beans thoroughly to avoid excess moisture in the curry. Adjust cooking time by 10-15 minutes if using dried legumes.
Why did my curry turn out bland?
Most likely, the spices weren't bloomed properly. Always sauté whole spices (like cumin seeds) in oil for 30 seconds before adding ground spices to release their flavors. Also, taste as you go—add a pinch of salt or a dash of lime juice to brighten flavors. For extra depth, stir in 1 teaspoon fish sauce or ½ teaspoon smoked paprika at the end.