
Soups & Stews
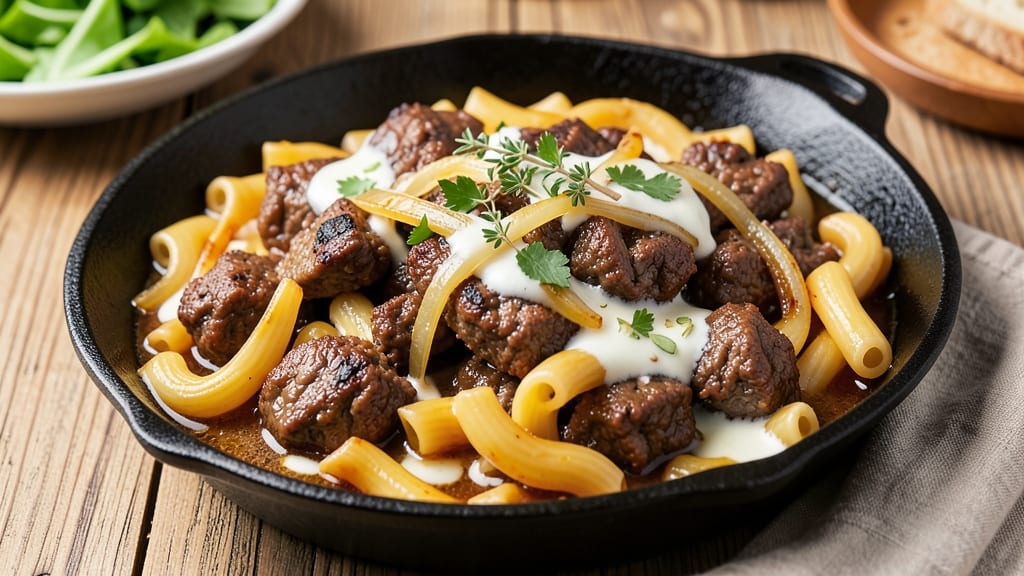
This beef and macaroni skillet recipe delivers juicy beef bites and perfectly cheesy macaroni in one foolproof one-pan meal—no fuss, no cleanup. The secret lies in browning the beef first to lock in flavor, then cooking the macaroni right in the same skillet with rich beef broth.
What starts as simple ingredients transforms into a hearty, crispy-topped dish that’s ready in 30 minutes and tastes like a restaurant favorite.
What makes this recipe stand out is the crispy cheese crust on top—achieved by sprinkling shredded cheddar and Parmesan while the dish bakes.
The macaroni absorbs all that savory beef flavor while staying tender, and the beef stays juicy thanks to a quick sear and just the right amount of seasoning. It’s the kind of meal that feels indulgent but comes together with minimal effort.
This skillet is perfect for busy weeknights when you want a hearty dinner without the stress of multiple dishes. The rich, cheesy aroma fills your kitchen while it cooks, and every bite delivers that perfect balance of tender beef, al dente pasta, and melty cheese.
Serve straight from the skillet for maximum flavor and presentation.
Whether you’re feeding a family or craving a comforting solo meal, this recipe scales easily and always delivers. The leftovers reheat beautifully, making it an ideal make-ahead option for meal prep. Let’s get cooking!
Ingredients for beef and macaroni skillet
Pantry staples plus a few fresh ingredients for a hearty, cheesy one-pan meal.
| Ingredient | Amount | Notes |
|---|---|---|
| Ground Beef 🥩 | 1 ½ lb | 80% lean for juiciness |
| Elbow Macaroni 🍝 | 12 oz | Uncooked, standard size |
| Yellow Onion 🧅 | 1 whole | Medium size, diced |
| Garlic Cloves 🧄 | 4 cloves | Fresh, minced |
| Beef Broth 💧 | 2 cups | Low-sodium preferred |
| Heavy Cream 🥛 | ½ cup | Full-fat for richness |
| Shredded Cheddar Cheese 🧀 | 2 cups | Sharp variety preferred |
| Parmesan Cheese 🧀 | ½ cup | Freshly grated |
| All-Purpose Flour 🌾 | 2 tbsp | For thickening sauce |
| Olive Oil 🫒 | 2 tbsp | For browning beef |
| Salt 🧂 | 1 ½ tsp | Kosher preferred |
| Ground Black Pepper 🌶️ | ½ tsp | Freshly ground |
| Dried Thyme 🌿 | ½ tsp | Or 1 tsp fresh |
The ground beef makes or breaks this dish—80% lean gives you that perfect balance of flavor and juiciness. Costco or Walmart usually have it pre-packaged in 1.5 lb bags, which is exactly what you need. If you're buying a whole pack, grab the chuck blend—it's cheaper and holds up better. The macaroni should be standard elbow shape; Barilla or De Cecco are my go-tos. Fresh thyme is ideal, but dried works in a pinch—just remember it's more concentrated. For the cheese, sharp cheddar is non-negotiable. Pre-shredded gets clumpy, so grab a block and grate it yourself.
No beef broth? Chicken broth with 1 tbsp Worcestershire sauce works in a bind, though the flavor won't be identical. Swapping cheddar for Monterey Jack makes it milder—great for picky eaters. Short on Parmesan? Pecorino Romano is a great substitute. The olive oil is just for browning, so any neutral oil will do. If you're making this ahead, cook the macaroni al dente—it'll finish cooking in the skillet. The flour is for thickening the sauce, so if you're watching carbs, you can skip it and just let the cheese melt into a thinner sauce.
This reheats beautifully—just add a splash of milk or broth to loosen it up. Keeps for 4 days in the fridge, though I never make it last that long. For leftovers, store in an airtight container with a sprinkle of cheese on top to keep it fresh. The skillet itself? Cast iron is ideal, but any oven-safe skillet works. If you're prepping ahead, cook the beef and onions first, then refrigerate separately and assemble straight from the fridge—no need to thaw.
Why You'll Love This Recipe
- One-Pan Magic: I swear by this skillet—no boiling pasta separately, no extra pots. Just brown the beef with onion and garlic, toss in the macaroni, add broth, and let it all bubble together. That’s it. The pasta soaks up the flavor right in the pan.
- Deep Umami Bite: The beef broth and ground beef create this rich, savory base that’s impossible to resist. Honestly, the first time I made it, I almost skipped dinner the next night just to have leftovers. That’s how good it is.
- Leftover Hero: This dish actually tastes better the next day—all those flavors meld together. I portion it into containers and freeze half, so I always have a quick, hearty meal. My kids fight over the leftovers, and that’s saying something.
- Budget-Friendly Feast: Ground beef and elbow macaroni are pantry staples that won’t break the bank. A single bag of pasta and a pound of beef stretch to feed four, and the onion and garlic add just enough freshness to make it feel special. No fancy ingredients, just pure satisfaction.
Step-by-step instructions for beef and macaroni skillet
This one-pan method delivers perfectly browned beef and tender pasta with a rich, cheesy finish.
Brown the Ground Beef
Heat 2 tablespoons olive oil in a large cast-iron skillet over medium-high heat until shimmering. Add the 1.5 lb ground beef, breaking it apart with a wooden spoon as it cooks. Let the beef brown undisturbed for 3-4 minutes—this creates flavorful crusts. Once it releases from the pan easily, break it into smaller pieces and continue cooking for another 2-3 minutes until fully browned.
Drain excess fat if needed, leaving about 1 tablespoon in the pan for flavor. Sprinkle with 1.5 teaspoons salt, 0.5 teaspoon ground black pepper, and 0.5 teaspoon dried thyme, stirring to coat evenly. Remove the beef from the skillet and set aside temporarily.
Sauté Onion and Garlic
In the same skillet, reduce heat to medium and add the diced yellow onion. Cook for 4-5 minutes until softened and translucent, stirring occasionally. Add the minced garlic cloves and cook for 30 seconds until fragrant—don't let it burn, or it will turn bitter.
Sprinkle the 2 tablespoons all-purpose flour over the onions and garlic, stirring constantly for 1-2 minutes until the mixture turns golden brown. This step creates a roux that will thicken your sauce beautifully.
Cook the Pasta and Build the Sauce
Pour in the 2 cups beef broth, scraping up any browned bits from the bottom of the pan. Stir well to combine, then add the 12 oz elbow macaroni. Bring to a gentle boil, then reduce heat to medium-low and simmer for 10-12 minutes, stirring occasionally, until the pasta is tender but still has a slight bite.
Return the browned beef to the skillet and stir to combine. Add the 0.5 cup heavy cream and 2 cups shredded cheddar cheese, stirring until the cheese melts completely and the sauce thickens to a creamy consistency. If the sauce is too thick, add 2-4 tablespoons of pasta water to reach your desired texture.
Finish and Crisp the Top
Transfer the skillet to a 400°F preheated oven and sprinkle the 0.5 cup freshly grated parmesan cheese evenly over the top. Bake for 5-7 minutes until the cheese is golden and bubbly, and the top forms a crispy crust. Watch closely—this step happens quickly, and you want that perfect golden-brown finish.
Let the skillet rest for 2-3 minutes before serving to allow the cheese to set slightly. The result should be juicy beef bites, tender pasta, and a rich, creamy sauce with a crispy cheesy top—all in one satisfying skillet.
Pro Tips For Making Beef And Macaroni Skillet
- CRISP THE ONIONS FIRST: I used to toss raw onion chunks into the pan with the beef and wonder why they stayed soggy. Instead, cook them in the same skillet for 5-6 minutes on medium-high heat until their edges turn golden—this builds flavor and prevents them from dissolving into the broth later. (Yes, even if you’re impatient like me.)
- DON’T SKIP THE BEAN DRAIN: After boiling the elbow macaroni, give it a quick rinse under cold water and drain thoroughly—I mean, until the colander’s dry enough to shake. Leftover starch makes the skillet gluey, and nobody wants a gummy mac and cheese texture fighting with the beef. (Your future self will curse you if you don’t.)
- SALT THE BROTH LIKE SOUP: Beef broth is the soul of this dish, but it’s easy to underseason it. Taste it before adding it to the skillet—aim for something just shy of fully seasoned, then adjust with extra salt or a splash of Worcestershire sauce. (I learned this the hard way after serving a bowl that tasted bland, no matter how much cheese I added.)
- BROWN THE BEEF IN BATCHES: If your skillet is crowded with ground beef, it’ll steam instead of sear, and you’ll end up with gray, pasty meat. Cook it in 2-3 batches on medium-high heat, breaking it up with a spoon only when it’s already browned. The crust on those edges? That’s where all the flavor hides. (I was skeptical until I tried it.)
Serving suggestions for leftovers
Skillet Presentation
Serve this skillet straight from the pan for that restaurant-worthy presentation. Use a large oven mitt to carry the hot skillet to the table, and let everyone dig in with a wooden spoon.
The crispy cheese edges will be extra tempting—just watch those elbows! For a cleaner look, transfer to a large platter using a spatula, keeping the cheesy crust intact. 🍽️
Topping Ideas
Add green onions or chopped parsley for freshness right before serving. A sprinkle of crushed red pepper flakes gives a subtle kick, while toasted breadcrumbs add crunch. For extra indulgence, top with crumbled bacon or sautéed mushrooms before baking to create a crispy layer.
Side Pairings
A simple side salad with mixed greens and a lemon vinaigrette balances the richness. Garlic bread or crusty rolls soak up any leftover sauce beautifully. For a lighter option, steamed broccoli or roasted asparagus adds color and freshness to the plate.
Beverage Pairings
Pair this hearty skillet with a crisp lager like Budweiser or Coors Light to cut through the richness. A bold red wine like Cabernet Sauvignon or Merlot complements the beef flavors. For a non-alcoholic option, iced tea with lemon or sparkling water with lime keeps it refreshing.
Make-Ahead Serving
Prep the skillet ahead by cooking the beef and onions, then refrigerate separately. Assemble and bake straight from the fridge—no need to thaw. For leftovers, reheat in the oven at 350°F for 10-15 minutes with a splash of milk or broth to restore creaminess.
Store in an airtight container for up to 4 days.
Family-Friendly Adjustments
For picky eaters, set up a "build-your-own" station with small bowls of cheese, breadcrumbs, and green onions. Kids love sprinkling their own toppings! If someone prefers no cheese, serve a side of garlic butter for dipping. This dish is naturally kid-friendly, but customization makes it even more fun. 🧒
Nutrition facts
Frequently asked questions
Can I use ground turkey instead of beef?
Ground turkey works perfectly and keeps the dish lighter. Use 1.5 lb lean ground turkey (93% lean or higher) to match the moisture content. You may need to add 1 extra tablespoon of flour to help thicken the sauce since turkey releases less fat. The cooking time remains the same—just ensure the turkey reaches 165°F internally.
Why did my cheese sauce get too thick?
This usually happens when the pasta absorbs too much liquid. To fix it, add 2-4 tablespoons of pasta water or milk while stirring. For next time, reduce the flour to 1.5 tablespoons if your pasta tends to cook faster. The sauce should coat the back of a spoon but still be pourable.
Can I make this skillet ahead of time?
Yes! Cook the beef and onions first, then refrigerate them separately. When ready to serve, combine everything in the skillet (including raw pasta) and bake as directed. The pasta will finish cooking during the baking process. For best results, assemble and bake straight from the fridge—no need to thaw.
What's the best way to reheat leftovers?
Reheat in the oven at 350°F for 10-15 minutes, covered loosely with foil. Add 1-2 tablespoons of milk or broth to restore creaminess. Microwaving works too—just stir every 30 seconds to prevent drying out. Store leftovers in an airtight container for up to 4 days.
How do I get the crispy cheese top without burning it?
Watch the oven closely during the last 2-3 minutes of baking. The cheese should be golden but not dark brown. If it browns too quickly, reduce the oven temperature to 375°F next time. For extra crispiness, sprinkle breadcrumbs on top before baking—this creates a crunchy layer that protects the cheese.