
Main Courses
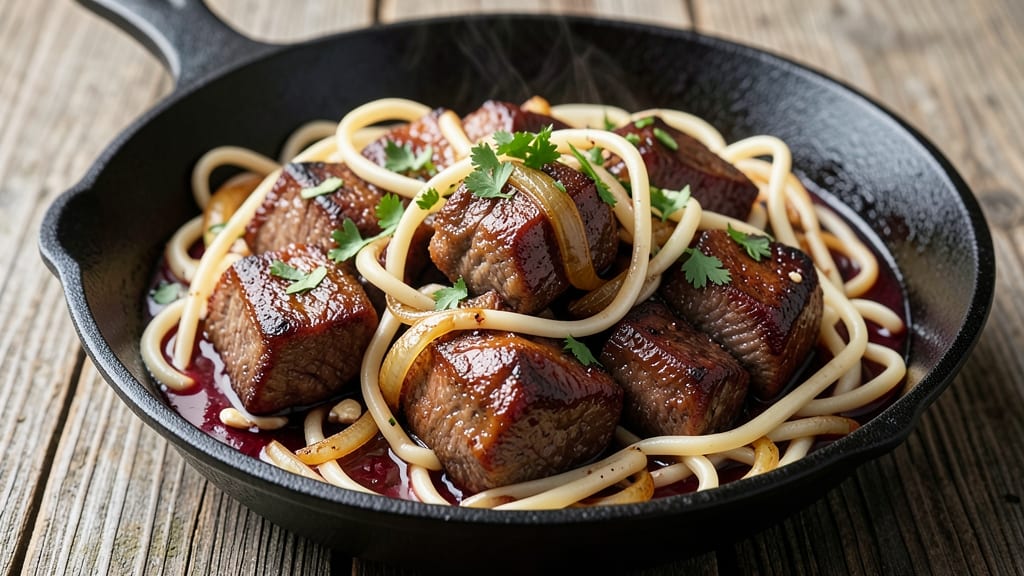
This deep-wine braised beef and noodles Dutch oven recipe transforms tough cuts into melt-in-your-mouth tenderness while keeping egg noodles perfectly al dente. The secret lies in searing beef to a rich crust before slow-braising in red wine and aromatics—creating a sauce that coats every noodle with deep, savory flavor.
I developed this method after years of perfecting Dutch oven braises, where layering ingredients and managing liquids makes all the difference.
The Dutch oven handles the entire process beautifully: searing beef releases deep caramelized flavors, while the enclosed lid traps moisture for tender meat and al dente noodles cooked directly in the braising liquid.
This one-pot method eliminates cleanup and delivers restaurant-quality results with simple ingredients—no fancy techniques required. The wine reduction adds complexity that elevates the dish beyond basic beef and noodles.
What you'll end up with is a rich, hearty dish where every forkful delivers tender beef, perfectly cooked noodles, and a velvety sauce infused with garlic, herbs, and wine.
The aroma alone will have everyone gathering at the table, and the leftovers reheat beautifully for days. This recipe proves Dutch oven cooking can be both impressive and effortless.
Serve with steamed greens or pickled vegetables to balance the richness, and save room for crusty bread to soak up every last drop of that flavorful sauce. Here's how to make it perfect every time.
Ingredients for beef and noodles dutch oven
Simple yet transformative ingredients for a Dutch oven masterpiece with wine-infused richness.
| Ingredient | Amount | Notes |
|---|---|---|
| Chuck Roast 🥩 | 2 lb | Cut into 1.5-inch cubes for even cooking |
| Egg Noodles 🍝 | 12 oz | Dry, medium-width preferred |
| Dry Red Wine 🍷 | 1 cup | Bold variety like Cabernet Sauvignon |
| Beef Broth 💧 | 2 cups | Low-sodium preferred for flavor control |
| Yellow Onion 🧅 | 1 whole | Diced into 1/4-inch pieces |
| Garlic Cloves 🧄 | 4 cloves | Minced for aromatic depth |
| Fresh Thyme 🌿 | 2 sprigs | Or 1 tsp dried thyme |
| Fresh Rosemary 🌿 | 1 sprig | Woody stems removed |
| Carrots 🥕 | 2 whole | Cut into 1-inch chunks |
| Tomato Paste 🍅 | 2 tbsp | Smooth, not chunky |
| Olive Oil 🫒 | 2 tbsp | Extra-virgin for searing |
| Salt 🧂 | 1 ½ tsp | Kosher or sea salt |
| Black Peppercorns 🌶️ | ½ tsp | Freshly cracked preferred |
| Bay Leaves 🌿 | 2 whole | Dried, for subtle flavor |
| Worcestershire Sauce 🍶 | 1 tbsp | For umami depth |
The beef is non-negotiable—chuck roast delivers that fall-apart texture when braised properly. Look for well-marbled cuts at the meat counter, and ask for it pre-cut into cubes if your butcher doesn't. Costco or Whole Foods usually carry high-quality chuck roast in bulk. If you're buying a whole roast, cube it yourself for even cooking. The wine? Bold, dry reds like Cabernet Sauvignon or Merlot work best—avoid sweet varieties that'll cloy the dish. Fresh herbs make a difference here, so grab thyme and rosemary from the grocery store's produce section where they're kept refrigerated. The egg noodles should be medium-width—they hold up better to the long braising time than thin varieties.
No red wine? Substitute beef broth with 1 tbsp balsamic vinegar for depth, though the dish won't be quite the same. Fresh thyme and rosemary? Dried works at half the amount, but fresh delivers that bright herbal note. The Worcestershire sauce adds umami—if you're vegetarian, use soy sauce instead. For the tomato paste, Trader Joe's sells convenient squeeze tubes that eliminate waste and keep perfectly. The carrots can be baby carrots if that's what you have, but whole carrots cut into chunks develop more flavor during braising. If you're short on time, pre-chop all vegetables before starting—they'll keep in the fridge for up to 3 days.
This dish gets better with time—plan ahead by prepping all ingredients the night before. The beef cubes can sit in the fridge for 2 days before cooking without losing quality, and the aromatics keep well in sealed containers. Leftovers reheat beautifully—simply warm in the Dutch oven with a splash of broth until heated through. For long-term storage, freeze portions in airtight containers for up to 3 months. The sauce thickens as it cools, so add a splash of broth when reheating if it seems too concentrated. Serve with crusty bread to soak up every last drop of that rich, wine-infused sauce.
Why You'll Love This Recipe
- One-Pot Magic: I swear by this recipe when I’m too tired to scrub a million pots. Chuck roast and noodles simmer together in the Dutch oven—no separate boiling, no straining. Just chop an onion, dump everything in, and let it work its magic while you pour wine and pretend you’re fancy.
- Wine-Infused Richness: That splash of dry red wine? It’s not just for show—it tenderizes the beef and adds this deep, savory depth that turns a simple beef stew into something special. The broth reduces down to a glossy, umami-packed sauce that coats every noodle like a hug.
- Lunchbox Hero: Between us, this is my go-to for meal prep. The leftovers reheat beautifully—perfect for lunches or a quick dinner when you’re starving but short on time. Pack it in a thermos, and you’ve got a hearty, filling meal that’ll keep you going through the afternoon slump.
- Budget-Busting Feast: Chuck roast is cheap, but it tastes like a steakhouse cut when braised low and slow. A big batch feeds four for dinner and leaves enough for lunch the next day—no sad, wilted leftovers here. Honestly, it’s the kind of dish that makes me feel like I’m feeding a crowd without breaking the bank.
Step-by-step instructions for deep-wine braised beef with al dente egg noodles
This Dutch oven method transforms tough chuck roast into tender, wine-braised beef with perfectly al dente noodles.
Sear the Chuck Roast for Maximum Flavor
Heat the Dutch oven over medium-high heat until hot. Add the 2 tablespoons olive oil and swirl to coat the bottom. Working in batches to avoid crowding, add the 2 lb chuck roast cut into 1.5-inch cubes and sear for 3-4 minutes per side until deeply browned. You'll see the edges develop a rich, caramelized crust—this is where all the flavor begins.
Don't rush this step. The goal is to create a fond (browned bits) that will dissolve into the sauce later. If the pan gets too crowded, reduce heat slightly to prevent steaming. Transfer the seared beef to a plate and set aside.
Build the Aromatic Base with Onions and Carrots
In the same Dutch oven, add the diced yellow onion and cut carrots in a single layer. Cook for 5-6 minutes until the onions soften and the carrots begin to caramelize at the edges. You'll notice the vegetables release their moisture and develop a golden hue—this is your signal to add the next layer of flavor.
Stir in the minced garlic cloves and cook for 30 seconds until fragrant. The garlic should sizzle slightly but not burn. Add the 2 tablespoons tomato paste and stir vigorously to coat the vegetables. This creates a rich, umami foundation for the braising liquid.
Deglaze and Braise the Beef
Pour in the 1 cup dry red wine and scrape up all the browned bits from the bottom of the Dutch oven using a wooden spoon. This deglazing step captures all the concentrated beef flavor. Let the wine simmer for 2-3 minutes until reduced by half, then add the 2 cups beef broth.
Return the beef to the Dutch oven along with the 2 sprigs fresh thyme, 1 sprig fresh rosemary, 2 whole bay leaves, 1.5 teaspoons salt, and 0.5 teaspoon cracked black peppercorns. Stir in the 1 tablespoon Worcestershire sauce. Bring to a gentle simmer, then cover and transfer to a 350°F oven.
Braise Until Tender and Infuse Flavors
Braise the beef for 2.5-3 hours until the meat is fork-tender and easily pulls apart. The liquid should reduce to a thick, glossy sauce that coats the back of a spoon. Check the internal temperature of the beef—it should reach 205°F for maximum tenderness.
About 30 minutes before the beef is done, add the 12 ounces egg noodles directly to the Dutch oven. Stir gently to coat them in the braising liquid. The noodles will absorb the rich flavors of the beef and vegetables as they cook. They're done when al dente—test by tasting one noodle.
Adjust Consistency and Serve
Remove the Dutch oven from the oven and let it sit uncovered for 5 minutes to allow any excess moisture to evaporate. If the sauce is too thick, add 2-4 tablespoons of hot water or beef broth to reach your desired consistency. The sauce should be velvety and cling to the beef and noodles.
Discard the herb sprigs and bay leaves. Taste and adjust seasoning with additional salt or pepper if needed. Serve the beef and noodles directly from the Dutch oven, allowing each person to enjoy the rich, wine-infused sauce that coats every bite. The result is a hearty, comforting dish where each component—tender beef, al dente noodles, and deeply flavorful sauce—comes together in perfect harmony.
Pro Tips For Making Beef And Noodles Dutch Oven
- SEAR THE MEAT FIRST: I used to toss the chuck roast straight into the broth, but searing it first—cut into 1.5-inch chunks—adds a depth of flavor that simmering alone can’t match. High heat for 3-4 minutes until deeply browned, then deglaze with that red wine right away—this isn’t just for looks, it’s the foundation.
- SALT THE NOODLES LATER: Egg noodles absorb liquid fast, so don’t salt the water when boiling them. Toss them with a pinch of salt after draining and right before adding to the Dutch oven—this keeps them from turning mushy while cooking in the broth. (Yes, even if you’re impatient like me.)
- DON’T SKIP THE REST: After browning the beef, let the chunks sit in the Dutch oven for 5 minutes before adding broth. This lets them release juices that’ll turn into a richer sauce later. I learned this the hard way—skipping it means a thinner, less flavorful end result.
- UPGRADE WITH AROMATICS: That onion alone isn’t enough. Add 2 garlic cloves smashed with the onion, plus a bay leaf and a sprig of thyme when you deglaze with wine. It’s an extra 2 minutes of prep, but the complexity makes the dish taste like it simmered all day—no shortcuts needed.
Pro cooking tips for great beef and noodles dutch oven
Sear Like a Pro
That initial sear transforms tough chuck roast into melt-in-your-mouth perfection. Heat your Dutch oven over medium-high heat until it's screaming hot—test by flicking a drop of water that sizzles instantly. Use 2 tablespoons extra-virgin olive oil (like California Olive Ranch) and work in batches to avoid steaming the meat.
Sear each 1.5-inch cube for 3-4 minutes per side until deep golden brown. This creates a fond—those browned bits—packed with flavor that dissolves into your sauce later. 🔥
Layer Aromatics Properly
Don't just dump all your veggies in at once—build flavor in stages. Start with onions and carrots in a single layer, cooking them until they soften and caramelize (5-6 minutes). Then add garlic and tomato paste to create that rich umami base.
The key is patience here: let the garlic sizzle for 30 seconds max to avoid burning, which turns bitter. Stir vigorously when adding tomato paste to coat everything evenly. This layering creates depth that separates home cooks from pros.
Wine Reduction Magic
After searing, deglaze with 1 cup bold red wine (Cabernet Sauvignon works best) and let it reduce by half before adding broth. This reduction concentrates flavors exponentially. I like to use Trader Joe's Cabernet because it's consistently good without breaking the bank.
The wine should smell rich and slightly jammy by the time you add the broth—this is your signal it's ready. If you're using a cheaper wine, add 1 tsp balsamic vinegar to compensate for the lack of depth.
Braising Temperature Control
Your oven should be at 350°F for perfect braising, but here's the pro tip: if your oven runs hot, reduce to 325°F to prevent the liquid from evaporating too quickly. The beef needs to reach 205°F internal temperature for maximum tenderness.
I use a Meater instant-read thermometer because it's fast and accurate. The liquid should reduce to a thick, glossy sauce that coats the back of a spoon—if it's too thin, uncover and simmer for 10-15 minutes to thicken.
Noodle Timing Trick
Add the noodles 30 minutes before the beef is done—this ensures they cook perfectly al dente in the rich braising liquid. Stir them gently to distribute evenly, but don't overmix or they'll turn mushy. Test one noodle by tasting it raw—it should have a slight bite.
The noodles absorb the beef's juices and flavors during this final stage, making every bite incredible. I recommend Barilla egg noodles because they hold up well to long cooking times without turning to mush. 🍝
Final Sauce Adjustment
After removing from the oven, let the dish sit uncovered for 5 minutes to allow any excess moisture to evaporate. If the sauce is too thick, add 2-4 tablespoons hot water or broth to reach that perfect velvety consistency.
Taste and adjust seasoning—this is where most home cooks miss the mark. The sauce should be rich but not salty, with bright herb notes from the thyme and rosemary. A final sprinkle of fresh parsley adds freshness and makes the dish look restaurant-worthy.
Trust your taste buds here—this is where the magic happens.
Nutrition facts
Frequently asked questions
Can I use a different cut of beef instead of chuck roast?
Yes, but with adjustments! Short ribs or brisket work beautifully—they're even more flavorful when braised. Use 1.5-inch cubes and braise for 3-4 hours until fork-tender. Avoid lean cuts like sirloin, as they won't become tender enough with this method. For best results, stick with chuck roast or short ribs.
How do I keep the egg noodles from turning mushy?
Add the noodles only 30 minutes before the beef is done and stir gently to distribute them evenly. Avoid overmixing, which breaks the noodles. For extra insurance, use Barilla egg noodles—they hold up better than most brands. If your noodles still seem soft, let the dish sit uncovered for 5 extra minutes after removing from the oven.
Can I make this recipe on the stovetop instead of the oven?
Sear the beef and build the aromatics as directed, then reduce the wine and add broth. Simmer uncovered on low heat for 2-2.5 hours, stirring occasionally to prevent sticking. Add the noodles 20 minutes before the end and stir gently. The sauce will be slightly thinner than oven-braised, but still delicious.
What's the best way to reheat leftovers?
Gently reheat in the Dutch oven over low heat with 2-3 tablespoons of broth or water to loosen the sauce. Cover and warm through, stirring occasionally. Avoid microwaving—it makes the noodles rubbery. Leftovers keep well for 4 days refrigerated or 3 months frozen in airtight containers.
Can I substitute white wine for red wine in this recipe?
Not ideal, but you can make it work! Use 1 cup dry white wine and add 1 teaspoon balsamic vinegar for depth. The dish will be lighter in color but still flavorful. For best results, stick with bold red wine like Cabernet Sauvignon—the tannins help tenderize the beef and complement the rich sauce.