
Main Courses
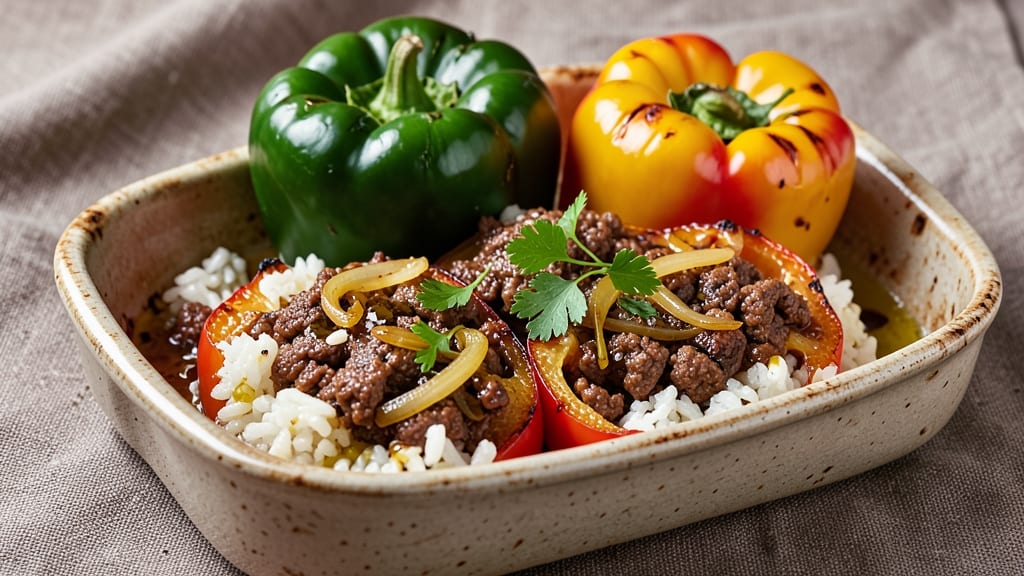
This beef and rice stuffed bell pepper recipe transforms vibrant peppers into hearty, smoky bites that taste like a restaurant-worthy meal. The secret lies in perfectly browned ground beef and aromatic spices that infuse the rice filling, creating layers of flavor that melt together in the oven.
I developed this version to deliver restaurant-quality results without requiring advanced techniques—just smart prep and patience for baking.
What sets this recipe apart is the balance of textures and flavors: tender beef, fluffy rice, and a blanket of melted cheese that creates those irresistible rivers when sliced. The smoky paprika and cumin give the filling depth, while the bell peppers add natural sweetness that brightens every bite.
This dish is hearty enough to stand alone but pairs beautifully with a simple side salad or crusty bread to soak up any extra juices.
The process is straightforward but requires attention to key steps: browning the beef thoroughly for rich flavor, cooking the rice to perfection, and stuffing the peppers generously so they hold their shape during baking.
The result is a dish that's impressive enough for company but simple enough for a weeknight dinner. Each pepper becomes a flavor-packed vessel, ready to be served with a drizzle of sour cream or a sprinkle of fresh herbs.
Whether you're feeding a family or preparing for a gathering, this recipe scales effortlessly and delivers consistent results. The combination of smoky, savory, and slightly sweet flavors makes it universally appealing, while the hands-on preparation adds a satisfying element to any meal.
Let's get started on creating these flavorful stuffed peppers that will have everyone asking for seconds.
Ingredients for beef and rice stuffed bell pepper
Four vibrant peppers become flavor-packed vessels with these simple yet transformative ingredients.
| Ingredient | Amount | Notes |
|---|---|---|
| Ground Beef 🥩 | 1 lb | 80/20 fat ratio preferred |
| Long-Grain White Rice 🍚 | 1 cup | Uncooked, jasmine or basmati |
| Beef Broth 💧 | 1 ½ cups | Low-sodium preferred |
| Tomato Paste 🍅 | 2 tbsp | Squeeze tube or canned |
| Yellow Onion 🧅 | 1 whole | Medium size, diced |
| Garlic Cloves 🧄 | 3 cloves | Fresh, minced |
| Smoked Paprika 🌶️ | 1 tbsp | Sweet or hot variety |
| Ground Cumin 🌿 | 1 tsp | Toasted for depth |
| Salt 🧂 | 1 tsp | Kosher or sea salt |
| Black Pepper 🌶️ | ½ tsp | Freshly ground |
| Shredded Monterey Jack Cheese 🧀 | 1 ½ cups | Or sharp cheddar blend |
| Large Bell Peppers 🌶️ | 4 whole | Any color, tops cut off |
| Olive Oil 🫒 | 2 tbsp | For browning beef |
| Fresh Parsley 🌿 | ¼ cup | Chopped, for garnish |
The ground beef is where the magic starts—80/20 fat ratio gives you that rich, caramelized flavor when browned. Costco or Walmart usually have it pre-packaged in 1-pound bags, which is perfect for this recipe. If you're buying whole packs, look for good marbling—it's what makes the meat juicy. The smoked paprika is non-negotiable here; it's what gives those restaurant-quality smoky notes. I always grab mine from the bulk section at Trader Joe's—it's cheaper and fresher than the tiny jars. Fresh parsley might seem like an afterthought, but it adds that bright pop of color and freshness that ties everything together.
No smoked paprika? Regular paprika plus a pinch of liquid smoke gets you close. Using pre-cooked rice? Rinse it first to remove excess starch so your filling doesn't get gummy. The tomato paste can be from a squeeze tube—Trader Joe's has great ones—or a can. If you're short on time, pre-diced onions from the produce section work fine, but fresh is always better. The bell peppers should be firm and vibrant; avoid any with soft spots. If you can't find Monterey Jack, sharp cheddar or a Mexican blend melts just as beautifully.
Stuffed peppers keep 3-4 days in the fridge, but they reheat best when fresh. For meal prep, bake an extra batch and freeze them unassembled—they reheat perfectly. The filling reheats well too, so you can make it ahead and stuff the peppers right before baking. Portion the cheese separately if you're worried about browning—just sprinkle it on top during the last 5 minutes of baking. Leftovers? Serve them cold with a dollop of sour cream or hot with some extra cheese on top—both are winners.
Why You'll Love This Recipe
- One-Pot Magic: I swear by this recipe because it’s literally one bowl, one pan, and done. The rice cooks right in the beef mixture—no separate pot, no fuss—while the peppers roast alongside. Even if you’re the kind of cook who burns toast, this’ll turn out.
- Savory Crunch Factor: That crispy pepper skin paired with the tender, herby beef-rice filling? It’s the kind of bite that makes you pause mid-fork. The tomato paste gives it a deep, umami richness, and the onion adds just enough sweetness to balance the beef’s boldness.
- Meal Prep MVP: Between us, this is my go-to for busy weeks. Make a batch on Sunday, and you’ve got lunch or dinner covered for days—just reheat and enjoy. Honestly, the flavors even get better the next day, especially if you let them sit overnight.
- Budget-Friendly Feast: Ground beef and rice stretch for miles, and you’re not sacrificing flavor. A single onion and a can of broth keep costs low, but the result? A hearty, satisfying dish that feels special without breaking the bank. (Yes, even on a Tuesday night.)
Step-by-step instructions for smoky paprika-kissed stuffed bell peppers
Here's how to create hearty, flavorful stuffed peppers with perfectly balanced textures and rich seasoning.
Prepare the Bell Peppers
Preheat your oven to 375°F and line a baking sheet with parchment paper. Cut the tops off the 4 whole large bell peppers, removing seeds and membranes. I use a sharp chef's knife for this—keep the tops intact so you can use them as lids later. Rinse the peppers under cold water and pat them completely dry with paper towels.
Place the prepared peppers upright on the baking sheet. This step ensures they hold their shape during baking and prevents waterlogging, which can make the filling soggy. You'll want to bake them for 15 minutes before stuffing—this softens the pepper walls just enough to absorb flavor without losing their structure.
Cook the Rice and Seasoning Base
In a medium saucepan, combine 1 cup long-grain white rice, 1.5 cups beef broth, 2 tablespoons tomato paste, 1 tablespoon smoked paprika, 1 teaspoon ground cumin, 1 teaspoon salt, and ½ teaspoon black pepper. Bring to a boil over medium-high heat, then reduce to low heat, cover, and simmer for 15 minutes.
While the rice cooks, heat 2 tablespoons olive oil in a large skillet over medium heat. Add the 1 whole yellow onion and 3 cloves garlic cloves, cooking until the onion is translucent and the garlic is fragrant (5-6 minutes). Add this aromatic mixture to the rice once it's tender. The rice should absorb most of the broth, leaving it slightly sticky—this helps it cling to the peppers during baking.
Brown the Ground Beef
In the same skillet, increase heat to medium-high and add 1 lb ground beef. Break it apart with a wooden spoon and cook until it loses its raw color and begins to brown (5-7 minutes). Drain any excess fat if needed, then stir in the cooked rice mixture. Remove from heat and let the filling cool slightly—this prevents the cheese from melting too quickly when you stuff the peppers.
Here's the thing—don't skip browning the beef. This step develops deep, meaty flavor that transforms a simple filling into something rich and satisfying. If you're using an 80/20 fat ratio, the rendered fat will add extra moisture to the peppers during baking.
Stuff and Bake to Perfection
Fill each pepper generously with the beef and rice mixture, pressing down gently to compact the filling. Top each with ½ cup shredded Monterey Jack cheese and replace the pepper tops. Place the stuffed peppers on the baking sheet and bake for 30-35 minutes until the peppers are tender and the cheese is bubbly and golden.
You'll know they're done when the cheese has melted into rivers and the peppers feel soft when squeezed gently. If the cheese browns too quickly, tent the baking sheet with foil for the last 10 minutes to prevent over-browning. The filling should be hot throughout, with no cold spots in the center.
Garnish and Serve
Remove the stuffed peppers from the oven and let them rest for 5 minutes before serving. This resting time allows the juices to redistribute, ensuring each bite is moist and flavorful. Sprinkle with ¼ cup chopped fresh parsley just before serving to add a bright, fresh contrast to the smoky, cheesy filling.
Serve immediately with a side of crusty bread or a simple green salad. The peppers should be tender enough to pierce easily with a fork, with a crisp exterior that gives way to creamy, flavorful filling. Each bite should deliver a perfect balance of smoky paprika, savory beef, and melty cheese—this is what makes stuffed peppers so satisfying.
Pro Tips For Making Beef And Rice Stuffed Bell Pepper
- Cook Beef Until Done: The ground beef’s job isn’t just browning—it needs to hit at least 160°F to kill bacteria and avoid that slightly undercooked, greasy texture. I used to pull it when it looked done, but now I wait until it’s firm and the juices run clear. (Yes, even if you’re impatient like me.)
- Rinse Rice Twice: Long-grain rice absorbs flavor like a sponge, but it also soaks up excess starch, making your filling gummy. Give it a quick rinse under cold water before cooking, then drain well. This isn’t the prettiest method, but it’s the tastiest—your stuffed peppers will stay light and separate.
- Pre-Cook the Filling: Stuffing raw beef and rice into peppers then baking them is a recipe for uneven cooking and sad, underdone centers. Cook the filling first—beef, rice, and all—until it’s just moist, not saucy. This guarantees the peppers bake through without turning into soup vessels.
- Salt the Broth Early: Adding salt only at the end means your beef and rice will taste flat until the very last bite. Season the beef broth before you mix it with the tomato paste and onion—this lets the flavors meld properly. (Your future self will notice the difference, I promise.)
Wine and beer pairings for this dish
Red Wine Pairings
A bold Zinfandel from California is my go-to choice for these stuffed peppers—its jammy berry and spice notes complement the smoky paprika and rich beef beautifully. Look for a 2018 or newer vintage with 14-15% ABV to stand up to the dish's hearty flavors.
Serve it slightly chilled (55-60°F) to enhance its fruitiness without overwhelming the meal. 🍷
Crisp White Options
For a lighter pairing, try a Spanish Albariño with its citrusy brightness and mineral finish. The acidity cuts through the richness of the cheese while the peach and melon notes in the wine mirror the natural sweetness of the bell peppers.
I recommend Pazo de Señorans or Martín Códax for quality options under $20. Serve at 48-50°F for optimal balance.
Beer Recommendations
A Mexican Lager like Modelo Especial or Pacifico works wonderfully with this dish, offering a clean, crisp profile that doesn't compete with the smoky filling. The subtle malt sweetness enhances the cheese, while the effervescence cleanses your palate between bites.
For craft beer lovers, a Belgian Witbier (like Allagash White) adds a peppery, citrusy contrast that pairs surprisingly well with the paprika. 🍺
Unexpected Pairings
Don't overlook rosé wines—a dry Provence-style rosé with its strawberry and herbal notes creates a delightful bridge between the smoky filling and fresh parsley garnish. I love Whispering Angel or Château d'Esclans for their balance of fruit and minerality.
For a non-alcoholic option, try sparkling water with a splash of lime juice—it refreshes the palate without overpowering the dish.
Serving Temperature Tips
Wine and beer should always be served at the right temperature to highlight their best qualities. Red wines like Zinfandel should be slightly cooler than room temperature—about 55-60°F—to enhance their fruit flavors.
Whites like Albariño shine at 45-48°F, while beers should be served at 38-42°F for lagers and 45-50°F for witbiers. Use an ice bucket for quick chilling or refrigerate for longer storage.
Make-Ahead Pairing Strategy
If you're preparing this dish ahead of time, store the stuffed peppers (unbaked) in an airtight container in the fridge for up to 24 hours. When ready to bake, let them sit at room temperature for 30 minutes before serving.
Pairing-wise, I recommend opening your wine or beer 1-2 hours** before serving to allow it to breathe and develop its full flavor profile. This timing ensures your beverage complements the dish at its peak. ✨
Nutrition facts
Frequently asked questions
Can I use ground turkey instead of beef?
Yes! Ground turkey works beautifully—just use 1 lb lean turkey (93% lean or less) and add 1 teaspoon olive oil to the pan to prevent drying out. For extra flavor, add ½ teaspoon smoked paprika directly to the turkey while browning. The texture will be slightly lighter but still delicious.
Why are my stuffed peppers falling apart?
This usually happens when the peppers aren't dry enough or the filling isn't packed tightly. Always pat peppers completely dry and press the filling firmly. For extra stability, parboil the peppers for 3 minutes before stuffing to soften them slightly. Another trick: Use red bell peppers—they're thicker-walled than green or yellow.
How do I make this dish ahead of time?
Prepare the filling completely (cook rice + beef) and store it in an airtight container in the fridge for up to 3 days. Stuff the peppers just before baking—this keeps them crisp. For freezing, assemble peppers (unbaked) and freeze for 2 months. Thaw overnight in the fridge before baking as directed.
Can I make this recipe in a slow cooker?
Brown the beef and cook the rice as directed, then combine everything in the slow cooker. Cover and cook on LOW for 3-4 hours or HIGH for 2 hours. Add cheese in the last 15 minutes to prevent over-melting. The peppers will be softer but still flavorful—great for meal prep!
What's the best way to reheat leftovers?
Place stuffed peppers in a baking dish, cover with foil, and reheat at 350°F for 15-20 minutes. For microwave reheating, cover with a damp paper towel and heat in 1-minute intervals on 50% power. Avoid high heat to prevent drying out the filling.