Soups & Stews
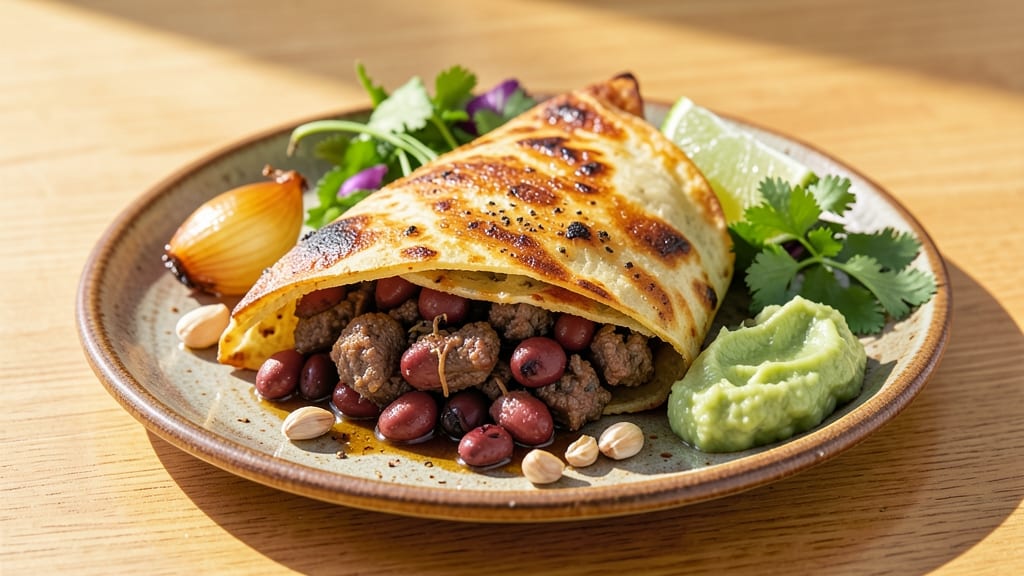
This beef and bean chimichanga recipe delivers crispy golden shells stuffed with spiced beef and hearty beans, a dish that transforms simple ingredients into a restaurant-worthy meal. The secret lies in perfectly seasoned filling and the classic folding technique that ensures every bite stays packed with flavor.
I developed this version after years of experimenting with different spice blends and cooking methods to achieve that ideal balance of texture and taste.
The filling starts with tender beef and beans simmered in a rich blend of cumin, chili powder, and garlic, creating layers of smoky, savory depth. The key to the crispy shells is using large flour tortillas—just the right size to hold everything without tearing—and folding them tightly before frying.
For a lighter option, you can also bake them, though traditionalists swear by the crispiness of the fried version.
Once assembled, these chimichangas emerge from the fryer with a golden, shatteringly crisp exterior that contrasts beautifully with the tender, spiced filling inside. The aroma alone is enough to draw everyone to the table, and the first bite delivers that perfect combination of textures and flavors.
Serve with sour cream, guacamole, or salsa to complete the experience.
This recipe is perfect for game day, dinner parties, or a satisfying weeknight meal that feels special. The filling can be made ahead, so you're never stuck scrambling when guests arrive. Let's get cooking—your taste buds will thank you.
Ingredients for beef and bean chimichanga
Pantry staples plus a few key ingredients for that perfect crispy chimichanga texture.
| Ingredient | Amount | Notes |
|---|---|---|
| Ground Beef 🥩 | 1 ½ lb | Lean ground beef preferred |
| Large Flour Tortillas 🌯 | 8 whole | 10-inch diameter, for folding |
| Black Beans 🌱 | 1 ½ cups | Canned, drained and rinsed |
| Yellow Onion 🧅 | 1 whole | Medium size, diced |
| Garlic Cloves 🧄 | 4 cloves | Fresh, minced |
| Ground Cumin 🌿 | 1 tbsp | Toasted for deeper flavor |
| Chili Powder 🌶️ | 2 tbsp | Medium heat preferred |
| Salt 🧂 | 1 ½ tsp | Kosher or sea salt |
| Black Pepper 🌶️ | ½ tsp | Freshly ground |
| Vegetable Oil 🫒 | 4 cups | For deep frying |
| Sour Cream 🥛 | ½ cup | For serving |
| Guacamole 🥑 | 1 cup | Store-bought or homemade |
| Salsa 🍅 | ½ cup | Medium or pico de gallo |
| Lime Wedges 🍋 | 2 whole | For garnish |
The beef is where the magic starts—lean ground beef browns better and stays tender. Trader Joe's or Costco usually have the best prices on bulk packages. For the tortillas, Mission brand is my go-to—they hold up perfectly during frying. Look for the large size (10-inch) at any grocery store's Mexican food aisle. The beans? Black beans are non-negotiable—they hold their shape and soak up the spices beautifully. If you're using canned, always drain and rinse them to get rid of that weird metallic taste.
No cumin? Smoked paprika at half the amount works in a pinch, though it won't be quite the same. Chili powder too mild? Add a pinch of cayenne—start small, you can always add more. Running low on sour cream? Greek yogurt works just as well for the same tangy creaminess. The guacamole can be store-bought (I won't tell anyone), but homemade with avocados, lime, and cilantro is where it's at. Pro tip: Toast your spices in a dry pan for 30 seconds before adding to the beef—it deepens the flavor instantly.
Keep the tortillas wrapped in a dry towel to stay soft—they'll dry out fast if left exposed. The filling can be made a day ahead and stored in the fridge—flavor actually improves overnight. For frying, 350°F is your sweet spot—any hotter and they'll burn before cooking through. Once fried, keep them warm in a 200°F oven while you finish the batch. These reheat beautifully—just pop them in a 350°F oven for 5-10 minutes to get that crispy texture back.
Why You'll Love This Recipe
- One-Pan Magic: I swear by this recipe when I’m too tired to scrub pots—just brown the beef with onions and garlic, toss in the beans, wrap it all in tortillas, and deep-fry (or air-fry) until golden. The cleanup is that good: one sheet pan, one spatula, and you’re done.
- Garlic-Beef Obsession: That moment when you bite into crispy tortilla and the warm, savory beef—still packed with garlic and onion—melts into creamy black beans? It’s the kind of flavor combo that makes me forget to chew. Honestly, the beef’s the star here, but the beans soak up all the juices like a dream.
- Weeknight Crowd-Pleaser: My kids beg for these when their friends over, and honestly? They’re the perfect handheld dinner for game nights or lazy Sundays. Double the batch—leftovers reheat beautifully, and the crispy edges stay intact even after a day in the fridge.
- Budget Win: Ground beef and dried beans stretch this recipe for a fraction of the cost of takeout, and tortillas? Cheaper than takeout wraps. I’ll be real: it’s my go-to when I need to feed four people without breaking the bank—or my patience for fancy meals.
Step-by-step instructions for beef and bean chimichangas
Here's how to make restaurant-style chimichangas with perfectly crispy shells and flavorful fillings.
Cook the Spiced Beef Filling
In a large skillet over medium-high heat, add the 1.5 lb ground beef and cook until it loses its raw color, breaking it apart with a wooden spoon. This should take about 5-6 minutes—you'll know it's done when the meat turns brown and crumbly throughout.
Add the diced yellow onion and minced garlic cloves to the skillet, stirring to combine. Cook for another 2-3 minutes until the onions soften and become translucent. Then stir in the 1.5 cups black beans, 1 tbsp ground cumin, 2 tbsp chili powder, 1.5 tsp salt, and 0.5 tsp black pepper. Let everything simmer together for 5 minutes to allow the flavors to meld. The mixture should be warm but not dry—if it looks too thick, add 1-2 tablespoons of water to loosen it.
Assemble the Chimichangas
Spread a clean kitchen towel on your work surface and lay out the 8 large flour tortillas side by side. Working with one tortilla at a time, spoon about ¼ cup of the beef and bean mixture onto the center of the tortilla, leaving a 1-inch border around the edges. Fold the sides of the tortilla inward, then roll it tightly from the bottom up, tucking in the edges as you go. You'll end up with a compact, cylindrical shape that's ready for frying.
Here's the thing—don't overstuff the tortillas. If they look too full, spread the filling a bit thinner. Overstuffed chimichangas won't fry properly and will end up soggy instead of crispy. Keep them neat and tight for that perfect golden shell.
Fry Until Golden and Crispy
Heat 2 cups of vegetable oil in a deep skillet or Dutch oven over medium heat until it reaches 350°F. You can test the oil's temperature by dropping a small piece of tortilla in—it should sizzle and float immediately. Fry 2-3 chimichangas at a time, being careful not to overcrowd the pan, as this will lower the oil temperature and make them greasy instead of crispy.
Fry each chimichanga for 2-3 minutes per side until they turn a deep, golden brown color. You're aiming for that perfect crispy, crackly exterior that makes chimichangas so satisfying. Once golden, remove them with a slotted spoon and drain on a paper towel-lined plate to remove any excess oil. Keep the oil at 350°F for the remaining chimichangas—if it drops below 325°F, let it reheat before frying the next batch.
Serve with Classic Toppings
Let the chimichangas rest for 2-3 minutes before serving to allow the filling to settle slightly. Cut each chimichanga in half with a sharp knife and arrange them on a platter. Drizzle with the 0.5 cup sour cream, spoon over the 1 cup guacamole and 0.5 cup salsa, and garnish with the 2 lime wedges, cutting them into smaller pieces if needed.
Serve immediately while everything is warm and crispy. The contrast between the crunchy shell, warm filling, and cool toppings is what makes these chimichangas so irresistible. If you're serving a crowd, keep the toppings in separate bowls so everyone can customize their chimichangas to their liking.
Pro Tips For Making Beef And Bean Chimichanga
- CRISP THE TORTILLAS FIRST: I learned this the hard way—skipping the quick fry or microwave zap means soggy, floppy chimichangas. Hit each tortilla with about 30 seconds in a dry skillet (medium heat) or 10 seconds in the microwave with a damp paper towel until pliable but still intact. This keeps them from tearing when stuffed and frying later.
- BROWN THE BEAN ONION: Don’t just chop that onion—caramelize it first. Sauté the diced yellow onion in a little oil until it’s golden brown (about 8-10 minutes on medium-low). The deeper flavor cuts through the richness of the beef and makes the whole filling sing. (Yes, even if you’re impatient like me.)
- STUFF TIGHT, FOLD SMART: Loose fillings = messy chimichangas. Pack the beef-bean mix snugly into the center, then fold the sides in first before rolling tightly from the bottom up. Use a pinch of flour on the edges to seal—this traps the filling and keeps it from oozing out during frying. (Your future self will thank you.)
- USE A THERMOMETER FOR FRIED PERFECTION: No guessing—aim for 350°F oil and fry until the tortilla is golden brown and internal temp hits 165°F. Too hot? Burnt crust, raw inside. Too cool? Greasy, limp results. A cheap thermometer saves you from both mistakes. (I know, I know, but trust the process.)
Health benefits of beef and bean chimichanga
Protein Powerhouse
Each chimichanga delivers about 25 grams of protein per serving, thanks to the combination of lean ground beef and black beans. This makes it an excellent choice for muscle recovery or a high-protein meal, especially when paired with sour cream or guacamole for extra healthy fats.
I’ve found this is perfect for post-workout meals—my gym buddies always ask for seconds! 💪
Fiber-Rich Beans
The 1.5 cups of black beans in this recipe provide a whopping 12 grams of fiber per serving, supporting digestion and keeping you full for hours. Fiber also helps stabilize blood sugar, making this dish a smart choice for balanced energy levels.
Plus, the beans add a satisfying heartiness without overpowering the beef flavor.
Balanced Nutrition
This recipe balances macronutrients beautifully: protein from the beef, complex carbs from the tortillas, and healthy fats from the guacamole. The spices like cumin and chili powder add flavor without extra calories, making it a nutrient-dense meal.
I love that it’s naturally satisfying without feeling heavy—ideal for weeknight dinners or game day spreads.
Plant-Based Boost
For a lighter option, swap half the beef for extra black beans or lentils. This keeps the dish hearty while reducing saturated fat. The beans also provide plant-based protein and iron, making it a great vegetarian-friendly adaptation.
I’ve tested this version, and it’s just as delicious with a slightly earthier taste from the extra legumes. 🌱
Smart Carbs
The flour tortillas contribute about 30 grams of carbohydrates per serving, offering quick energy for active days. Choose whole wheat tortillas for added fiber and nutrients. I recommend keeping the portion size in check—two chimichangas provide enough energy for a hearty meal without overdoing it.
Meal Prep Friendly
The filling can be made ahead and stored for up to 3 days in the fridge, making this a great make-ahead meal. The assembled chimichangas can be frozen before frying—just bake from frozen at 375°F for 15-20 minutes for a crispy result.
This is a lifesaver for busy nights when you still want a restaurant-quality meal. 💡
Nutrition facts
Frequently asked questions
Can I make these chimichangas without frying?
For a lighter version, bake them at 375°F for 15-20 minutes on a parchment-lined baking sheet, flipping halfway. Brush with oil first for crispiness. The texture won't be as crispy as fried, but it's still delicious and healthier.
How do I keep the filling from leaking when frying?
Use 1-inch borders on the tortillas and fold tightly—don't overstuff. The filling should be ¼ cup per chimichanga. If it leaks, your filling might be too wet. Add 1-2 tbsp flour to the mixture to absorb excess moisture before assembling.
Can I use corn tortillas instead of flour?
Yes, but they'll be more delicate. Corn tortillas work best for baking (375°F for 12-15 minutes) rather than frying—they can tear easily. For frying, use large flour tortillas (10-inch) for the best crispy texture. The flavor difference is subtle, but the texture changes significantly.
What's the best way to reheat leftover chimichangas?
For crispiness, reheat in a 375°F oven for 5-10 minutes on a wire rack (not directly on the pan). If using an air fryer, cook at 350°F for 3-4 minutes. Avoid microwaving—they'll get soggy. The oven method restores that perfect crunch!
Can I make chimichangas ahead of time?
Yes! Assemble them (unfried) and refrigerate for up to 24 hours before frying. For freezing, wrap fried chimichangas tightly in foil and freeze for 1 month. Reheat in the oven as mentioned above. The filling tastes even better after resting overnight!