
Soups & Stews
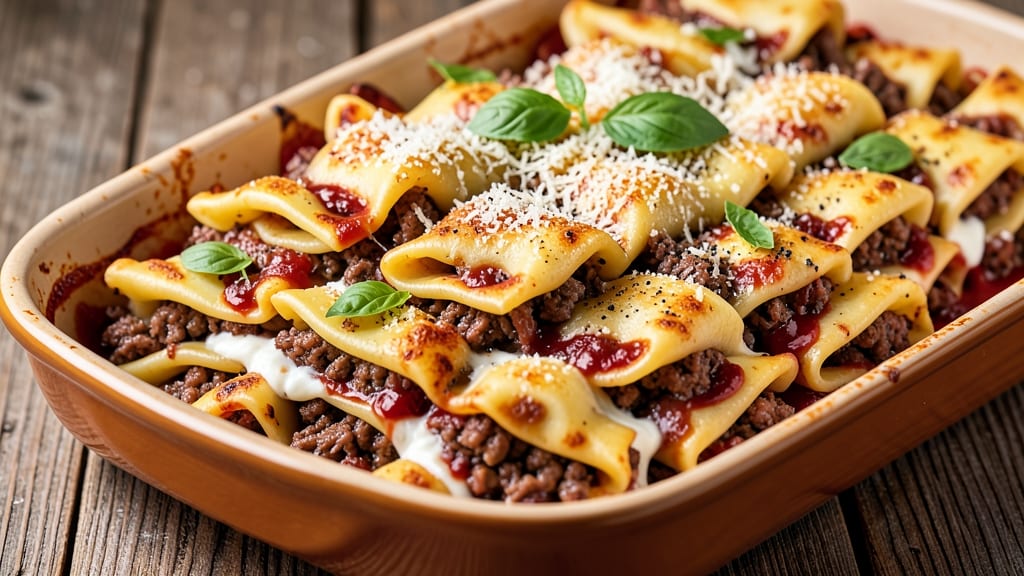
This beef and sausage manicotti recipe delivers the ultimate comfort food experience—rich, hearty layers of tender pasta shells stuffed with savory meat and melted cheese, baked to gooey perfection.
The combination of ground beef and Italian sausage creates a deeply flavorful filling, while a creamy béchamel sauce binds everything together. What makes this dish special is the balance of textures: crispy edges on the pasta, tender meat, and a velvety cheese sauce that pulls it all together.
The key to achieving restaurant-quality results at home lies in proper layering and baking technique. You'll start by preparing a flavorful meat-sausage filling, then assemble the manicotti with layers of pasta, cheese, and sauce. Baking at the right temperature ensures the pasta shells soften just enough while maintaining their structure.
This recipe is designed to be both traditional and approachable, with tips to help you achieve professional results without the fuss.
By the time you pull this dish from the oven, you'll have a golden, bubbling masterpiece that's impossible to resist. The aroma alone will have everyone gathering around the table, and the first bite delivers that perfect combination of savory meat, creamy cheese, and tender pasta.
It's the kind of meal that feels indulgent yet satisfies even the pickiest eaters.
Serve with a simple side salad and crusty garlic bread to soak up every last drop of that delicious sauce. Pair it with a glass of Chianti or a light red wine cocktail for the complete Italian dining experience. Let's get started on creating your perfect manicotti!
Ingredients for beef and sausage manicotti
Here's everything you need to create restaurant-quality beef and sausage manicotti at home.
| Ingredient | Amount | Notes |
|---|---|---|
| Manicotti Pasta Shells 🍝 | 24 pieces | Fresh or dried, cooked al dente |
| Ground Beef 🥩 | 1 ½ lb | 80% lean, finely chopped |
| Italian Sweet Sausage 🌭 | 1 lb | Casings removed, crumbled |
| Ricotta Cheese 🧀 | 2 cups | Part-skim for creaminess |
| Parmesan Cheese 🧀 | 1 cup | Freshly grated, block form |
| Large Eggs 🥚 | 2 whole | Room temperature for binding |
| All-Purpose Flour 🌾 | ¼ cup | For dusting work surface |
| Heavy Cream 🥛 | 2 cups | Full-fat for velvety sauce |
| Yellow Onion 🧅 | 1 whole | Medium size, finely diced |
| Garlic Cloves 🧄 | 4 cloves | Minced, fresh flavor |
| Canned Tomato Sauce 🍅 | 2 cups | San Marzano preferred |
| Butter 🧈 | ½ cup | Unsalted, cubed |
| Dried Oregano 🍃 | 1 tbsp | Italian blend preferred |
| Ground Black Pepper 🌶️ | ½ tsp | Freshly cracked |
| Salt 🧂 | 1 ½ tsp | Kosher preferred |
The meat filling is where the magic happens. Ground beef and Italian sausage from the butcher counter at Whole Foods or your local grocer's meat department make all the difference—look for good marbling in the beef and bright, fresh sausage. Pre-grind your own if possible, but the pre-packaged stuff works in a pinch. For the pasta shells, De Cecco or Barilla are my go-tos—they hold up perfectly during baking. If using dried shells, cook them just 1 minute less than package instructions so they stay firm enough to hold their shape when stuffed.
No Italian sausage? Substitute with ground pork or extra beef—just add 1 tsp fennel seeds for that authentic flavor. Running low on ricotta? Cottage cheese blended until smooth works in a bind, though it's slightly less creamy. The tomato sauce can be homemade (simmer crushed tomatoes with garlic and basil) or store-bought—Rao's or Barilla are my pantry staples. For extra richness, stir 2 tbsp of the heavy cream into the meat filling before assembly. And trust me on this: skip the pre-shredded Parmesan—it's full of anti-caking agents that make the sauce grainy. Grate it yourself from a wedge.
Assembled manicotti keeps in the fridge for 3 days before baking—perfect for meal prep. Bake it, then store leftovers in an airtight container for 4-5 days. Freeze unbaked portions for 3 months by wrapping tightly in foil. Pro tip: Portion the filling into zip-top bags and freeze it separately—thaw and stuff as needed. The sauce reheats beautifully, so double it up for extra servings. This dish tastes even better the next day as all the flavors meld together—worth the anticipation!
Why You'll Love This Recipe
- One-Pan Assembly: I swear by this trick—just brown the beef and sausage in one skillet, then mix the filling right there. No extra bowls, no sticky messes, and the shells slide right into the sauce. It’s the kind of recipe where I can still chat with my kids while prepping.
- Meaty, Cheesy Magic: That combo of Italian sausage and ground beef? Rich and hearty without being heavy. The ricotta adds creamy pockets, and the Parmesan on top? It’s the kind of dish where my husband licks his plate—no joke.
- Weeknight or Company: Same recipe, two vibes. Serve it with a simple salad for a weeknight dinner, or add a side of garlic bread and a bottle of wine for guests. The shells hold up perfectly, so it’s my go-to for when I’m not sure who’s coming over.
- Leftovers That Don’t Suck: Between us, most manicotti turns into sad, soggy leftovers. Not this one. The sausage keeps it flavorful cold, and I’ve reheated slices straight from the fridge with zero complaints. Plus, it’s cheap to make—ricotta and ground beef stretch far, and I always have Parmesan on hand.
Step-by-step instructions for beef and sausage manicotti
Here's how to assemble this hearty, cheesy masterpiece with layers of flavor.
Cook the Manicotti Shells Al Dente
Boil a large pot of salted water until it reaches a rolling boil. Add the 24 pieces manicotti pasta shells and cook according to package directions for al dente texture. They should be tender but still have a slight bite—this prevents them from becoming mushy when baked. Drain immediately and set aside on a clean kitchen towel.
I like to give the shells a quick rinse under cool water to stop the cooking process. This also helps them hold up better during the layering process. Don't skip this step—it makes a big difference in the final texture of your manicotti.
Prepare the Meat Sauce
In a large skillet, cook the 1.5 lb ground beef and 1 lb Italian sweet sausage over medium heat until browned, breaking it into small pieces. You want to render out as much fat as possible while keeping the meat crumbly. Drain excess fat if needed, but leave about 1 tablespoon to add flavor.
Add the 1 whole yellow onion and 4 cloves minced garlic to the skillet, cooking until softened. Stir in the 2 cups canned tomato sauce, 1 tbsp dried oregano, 0.5 tsp ground black pepper, and 1.5 tsp salt. Simmer uncovered for 10 minutes to let the flavors meld together. This sauce will form the rich, meaty base for your manicotti.
Make the Cheese Filling
In a large bowl, combine the 2 cups ricotta cheese, 1 cup freshly grated parmesan cheese, 2 whole large eggs, and 0.25 cup all-purpose flour. Mix gently until just combined—don't overmix or the filling will become tough. The mixture should be thick but still spreadable.
I like to use a rubber spatula for this step to avoid overworking the ricotta. The filling should be smooth and hold together when pressed between your fingers. If it's too wet, add a bit more flour; if too dry, add a splash of milk (though we're not using milk here, a tiny amount wouldn't hurt).
Assemble the Manicotti
Preheat your oven to 375°F. Spread 1 cup of the meat sauce on the bottom of a 9x13-inch baking dish. This creates a flavorful base that prevents sticking. Dip each cooked manicotti shell in the cheese filling mixture, then place them seam-side up in the baking dish, slightly overlapping.
Spread another 1 cup of meat sauce over the shells, then add another layer of cheese filling. Top with the remaining 1 cup of meat sauce, pressing down gently to ensure good contact between layers. The cheese filling should be visible between the shells—this ensures maximum gooeyness when baked.
Bake to Gooey Perfection
Cover the baking dish tightly with aluminum foil and bake for 25 minutes. Remove the foil and bake for another 10 minutes until the top is golden brown and bubbly. The cheese should be melted completely and the edges should be slightly crispy.
Let the manicotti rest for 10 minutes before serving. This allows the filling to set slightly and makes slicing easier. The cheese should be stretchy and gooey, with tender pasta shells and rich, flavorful meat sauce in every bite. Serve with a sprinkle of additional parmesan cheese and a side of garlic bread.
Pro Tips For Making Beef And Sausage Manicotti
- Preheat That Pan: Boil your manicotti shells for exactly 2 minutes less than the package says—you’ll finish them in the oven. After draining, toss them in a bowl with a little olive oil and salt while they’re still hot; this keeps them from sticking together like glue. I learned this the hard way after wrestling with a clump of shells that refused to separate.
- Brown the Meat Properly: Don’t just crumble the sausage and beef into the pan—break it into large chunks first. Cook them on medium-high heat until they’re deeply browned, not just pink. That caramelization is what makes the filling sing, and skipping it leaves your manicotti tasting bland. Yes, it takes a few extra minutes, but it’s worth it.
- Blot the Ricotta Dry: Ricotta is sneaky—it’s got more moisture than it looks. Before mixing it with the eggs and Parmesan, spread it on paper towels and press gently to soak up excess liquid. Wet filling leaks out of the shells while baking, turning your manicotti into a soggy mess. Trust me, this small step saves you from a watery disaster.
- Layer Like a Pro: Start with a thin base of sauce in the baking dish—just enough to coat the bottom. This prevents the shells from sticking and burning. Then, fill each manicotti shell generously but not to the point of bursting (about 3/4 full). Top with sauce and cheese, then add a final layer of sauce on top. The extra sauce on top guarantees a bubbly, golden crust—no dry spots here.
Pro cooking tips for beef and sausage manicotti
Cheese Filling Secrets
The ricotta-cheese mixture is where texture magic happens. I always use part-skim ricotta for creaminess without excess water—full-fat gets too runny. The key is not overmixing: stir just until combined, or the filling turns gluey.
For extra richness, fold in 2 tbsp grated pecorino along with the parmesan. This adds depth and helps the filling hold together better during baking. 🧀
Sauce Layering Tricks
Spread 1 cup meat sauce on the baking dish bottom first—this prevents sticking and adds flavor to every bite. For the final sauce layer, I mix ½ cup heavy cream into the remaining sauce to create a silky, velvety finish.
This also helps the cheese melt more evenly. Don't skip the 10-minute uncovered bake at the end—this creates that perfect golden crust while keeping the sauce luscious.
Pasta Shell Prep
Cook shells 1 minute less than package instructions—they'll finish cooking in the oven. The rinse under cool water stops cooking instantly and helps them hold filling better. For extra insurance, I dust the work surface with all-purpose flour before stuffing.
This prevents sticking when assembling layers. Fresh pasta shells work best, but dried shells (like Barilla) hold up well if cooked perfectly al dente.
Baking Temperature Control
Start at 375°F but watch closely after removing foil. The ideal finish is golden brown with slight browning on edges—this indicates perfect doneness. If the top browns too quickly, tent loosely with foil.
For extra crispy edges, broil for 1-2 minutes at the very end. The internal temperature should reach 165°F when checked with a meat thermometer. 🌡️
Make-Ahead Mastery
Assemble manicotti up to 3 days ahead and refrigerate uncovered. This lets flavors meld beautifully. Bake straight from the fridge—just add 10-15 minutes to the baking time. For freezing, assemble but don't bake.
Wrap tightly in foil and freeze for up to 3 months. Thaw overnight in the fridge before baking. The cheese filling stays perfectly creamy when reheated this way.
Pro Equipment
Use a 9x13-inch baking dish—it's the perfect size for even heat distribution. For stuffing, I love a pasta shell stuffer (like the OXO Good Grips model) to fill shells evenly without tearing.
A microplane for grating parmesan gives you the finest texture possible. And always use heavy-duty aluminum foil for covering—it reflects heat better than regular foil. 🔥
Nutrition facts
Frequently asked questions
Can I use pre-made stuffed manicotti shells instead of making my own?
Pre-made shells save time and still deliver great results. Look for high-quality frozen manicotti shells that are pre-stuffed with ricotta and cheese. Just follow the package instructions for baking time—typically 20-25 minutes at 375°F. For extra flavor, brush them with a little olive oil before baking to get that golden crust.
How do I prevent the manicotti from getting soggy?
Sogginess happens when too much moisture gets trapped. First, cook the pasta shells 1 minute less than package instructions to prevent overcooking. Second, don't skip the 10-minute uncovered bake at the end—this helps evaporate excess moisture. Finally, spread 1 cup of meat sauce on the bottom of the baking dish before adding shells to create a barrier.
What's the best way to reheat leftovers?
Reheat manicotti in the oven for the best texture. Cover with foil and warm at 350°F for 15-20 minutes until heated through. For a quick fix, microwave portions covered with a damp paper towel for 1-2 minutes, then finish under the broiler for 1 minute to crisp up the top. Never reheat directly from frozen—thaw in the fridge first.
Can I make this dish vegetarian?
Yes! Swap the beef and sausage for mushrooms, lentils, or spinach mixed with 1 cup cooked quinoa or breadcrumbs for texture. Use nutritional yeast for a cheesy flavor in the filling. The ricotta-cheese mixture works perfectly with plant-based proteins. Just ensure your filling is well-seasoned with garlic, herbs, and a pinch of smoked paprika for depth.
Why did my manicotti fall apart when I cut it?
This usually happens from three common mistakes: overcooking the pasta shells, overmixing the cheese filling, or not letting the dish rest after baking. First, check your baking time—35-40 minutes total is ideal. Second, mix the filling just until combined to avoid toughness. Finally, always rest the manicotti for 10 minutes before slicing to let the filling set properly.